Compare commits
No commits in common. "d4e1a2ed838e8a71ed32f10b47bc66c1e27413e9" and "e8c21ca0230bff630c8adafbadce154063318156" have entirely different histories.
d4e1a2ed83
...
e8c21ca023
|
|
@ -1,27 +0,0 @@
|
||||||
# 使用官方的 Nginx 镜像作为基础镜像
|
|
||||||
FROM nginx:1.27.3
|
|
||||||
|
|
||||||
# 删除默认的 Nginx 配置文件
|
|
||||||
RUN rm /etc/nginx/conf.d/default.conf
|
|
||||||
|
|
||||||
# 将自定义的 Nginx 配置文件复制到容器中
|
|
||||||
COPY nginx.conf /etc/nginx/conf.d/default.conf
|
|
||||||
|
|
||||||
# 设置时区,构建镜像时执行的命令
|
|
||||||
RUN ln -sf /usr/share/zoneinfo/Asia/Shanghai /etc/localtime
|
|
||||||
RUN echo "Asia/Shanghai" > /etc/timezone
|
|
||||||
|
|
||||||
# 创建一个目录来存放前端项目文件
|
|
||||||
WORKDIR /usr/share/nginx/html
|
|
||||||
|
|
||||||
# 将前端项目打包文件复制到 Nginx 的默认静态文件目录
|
|
||||||
COPY dist/ /usr/share/nginx/html
|
|
||||||
# 复制到nginx目录下
|
|
||||||
COPY dist/ /etc/nginx/html
|
|
||||||
|
|
||||||
# 暴露 Nginx 的默认端口
|
|
||||||
EXPOSE 80
|
|
||||||
#EXPOSE 443
|
|
||||||
|
|
||||||
# 自动启动 Nginx
|
|
||||||
CMD ["nginx", "-g", "daemon off;"]
|
|
||||||
|
|
@ -1,32 +0,0 @@
|
||||||
map $http_upgrade $connection_upgrade {
|
|
||||||
default upgrade;
|
|
||||||
'' close;
|
|
||||||
}
|
|
||||||
|
|
||||||
server {
|
|
||||||
listen 80 ;
|
|
||||||
listen [::]:80;
|
|
||||||
server_name localhost;
|
|
||||||
client_max_body_size 5M; # 最大文件上传设置
|
|
||||||
|
|
||||||
location / {
|
|
||||||
root /etc/nginx/html;
|
|
||||||
index index.html index.htm;
|
|
||||||
try_files $uri /index.html;
|
|
||||||
}
|
|
||||||
|
|
||||||
# # 后端跨域请求
|
|
||||||
# location ~/api/ {
|
|
||||||
# proxy_pass http://172.17.0.1:8000;
|
|
||||||
# proxy_set_header Host $http_host;
|
|
||||||
# proxy_set_header X-Real-IP $remote_addr;
|
|
||||||
# proxy_set_header X-Forwarded-For $proxy_add_x_forwarded_for;
|
|
||||||
# proxy_set_header X-Forwarded-Proto $scheme;
|
|
||||||
# }
|
|
||||||
|
|
||||||
error_page 404 404.html;
|
|
||||||
|
|
||||||
location = /50x.html {
|
|
||||||
root html;
|
|
||||||
}
|
|
||||||
}
|
|
||||||
|
|
@ -1,7 +1,7 @@
|
||||||
---
|
---
|
||||||
title: 日记
|
title: 日记
|
||||||
index: false
|
index: false
|
||||||
icon: mingcute:diary-line
|
icon: laptop-code
|
||||||
category:
|
category:
|
||||||
- 我的
|
- 我的
|
||||||
- 记录
|
- 记录
|
||||||
|
|
|
||||||
|
|
@ -1,7 +1,7 @@
|
||||||
---
|
---
|
||||||
title: 面试问题
|
title: 面试问题
|
||||||
index: false
|
index: false
|
||||||
icon: hugeicons:question
|
icon: laptop-code
|
||||||
category:
|
category:
|
||||||
- 笔记
|
- 笔记
|
||||||
- 面试
|
- 面试
|
||||||
|
|
|
||||||
|
|
@ -1,7 +1,7 @@
|
||||||
---
|
---
|
||||||
title: ChatGPT问题记录
|
title: ChatGPT问题记录
|
||||||
index: false
|
index: false
|
||||||
icon: hugeicons:artificial-intelligence-02
|
icon: laptop-code
|
||||||
category:
|
category:
|
||||||
- 模型
|
- 模型
|
||||||
- ChatGPT
|
- ChatGPT
|
||||||
|
|
|
||||||
|
|
@ -1,7 +1,7 @@
|
||||||
---
|
---
|
||||||
title: 大模型
|
title: 大模型
|
||||||
index: false
|
index: false
|
||||||
icon: hugeicons:artificial-intelligence-06
|
icon: laptop-code
|
||||||
category:
|
category:
|
||||||
- 模型
|
- 模型
|
||||||
- ChatGPT
|
- ChatGPT
|
||||||
|
|
|
||||||
|
|
@ -1,15 +0,0 @@
|
||||||
---
|
|
||||||
title: C#
|
|
||||||
index: true
|
|
||||||
icon: devicon:csharp
|
|
||||||
headerDepth: 4
|
|
||||||
category:
|
|
||||||
- 笔记
|
|
||||||
- 记录
|
|
||||||
- 学习
|
|
||||||
- 基础
|
|
||||||
dir:
|
|
||||||
order: 1
|
|
||||||
---
|
|
||||||
|
|
||||||
<Catalog />
|
|
||||||
|
|
@ -1,16 +0,0 @@
|
||||||
# 标记过时方法
|
|
||||||
|
|
||||||
## C#:
|
|
||||||
在C#中,可以使用`[Obsolete]`特性来标记方法为不推荐的,同时在特性中提供不推荐使用该方法的信息,并建议使用替代方法。
|
|
||||||
|
|
||||||
```csharp
|
|
||||||
public class MyClass
|
|
||||||
{
|
|
||||||
[Obsolete("This method is not recommended. Use newMethod() instead.")]
|
|
||||||
public void NotRecommendedMethod()
|
|
||||||
{
|
|
||||||
// 方法实现
|
|
||||||
}
|
|
||||||
}
|
|
||||||
```
|
|
||||||
|
|
||||||
|
|
@ -1,14 +0,0 @@
|
||||||
# 精度丢失问题
|
|
||||||
|
|
||||||
## C# 中的精度丢失
|
|
||||||
+ **C#**:`float` 和 `double` 同样存在精度问题。
|
|
||||||
|
|
||||||
```csharp
|
|
||||||
Console.WriteLine(0.1 + 0.2); // 输出 0.30000000000000004
|
|
||||||
```
|
|
||||||
|
|
||||||
## 4. 解决方案
|
|
||||||
+ **高精度库**:使用如`decimal`(C#)库。
|
|
||||||
+ **整数运算**:将小数转换为整数进行计算,最后再转换回小数。
|
|
||||||
+ **格式化输出**:通过格式化控制小数位数,减少显示问题。
|
|
||||||
|
|
||||||
|
|
@ -1,15 +0,0 @@
|
||||||
---
|
|
||||||
title: Java
|
|
||||||
index: true
|
|
||||||
icon: devicon:java
|
|
||||||
headerDepth: 4
|
|
||||||
category:
|
|
||||||
- 笔记
|
|
||||||
- 记录
|
|
||||||
- 学习
|
|
||||||
- 基础
|
|
||||||
dir:
|
|
||||||
order: 1
|
|
||||||
---
|
|
||||||
|
|
||||||
<Catalog />
|
|
||||||
|
|
@ -1,16 +0,0 @@
|
||||||
# 标记过时方法
|
|
||||||
|
|
||||||
## Java:
|
|
||||||
在Java中,可以使用`@Deprecated`注解来标记方法为不推荐的,同时在注释中说明不推荐使用该方法,并提供替代方法的信息。
|
|
||||||
|
|
||||||
```java
|
|
||||||
public class MyClass {
|
|
||||||
/**
|
|
||||||
* @deprecated This method is not recommended. Use newMethod() instead.
|
|
||||||
*/
|
|
||||||
@Deprecated
|
|
||||||
public void notRecommendedMethod() {
|
|
||||||
// 方法实现
|
|
||||||
}
|
|
||||||
}
|
|
||||||
```
|
|
||||||
|
|
@ -1,14 +0,0 @@
|
||||||
# 精度丢失问题
|
|
||||||
|
|
||||||
## Java中的精度丢失
|
|
||||||
+ **Java**:`float`(32位)和 `double`(64位)也会出现类似问题。
|
|
||||||
|
|
||||||
```java
|
|
||||||
System.out.println(0.1 + 0.2); // 输出 0.30000000000000004
|
|
||||||
```
|
|
||||||
|
|
||||||
## 4. 解决方案
|
|
||||||
+ **高精度库**:使用如 `BigDecimal`(Java)库。
|
|
||||||
+ **整数运算**:将小数转换为整数进行计算,最后再转换回小数。
|
|
||||||
+ **格式化输出**:通过格式化控制小数位数,减少显示问题。
|
|
||||||
|
|
||||||
|
|
@ -1,15 +0,0 @@
|
||||||
---
|
|
||||||
title: JavaScript
|
|
||||||
index: true
|
|
||||||
icon: devicon:javascript
|
|
||||||
headerDepth: 4
|
|
||||||
category:
|
|
||||||
- 笔记
|
|
||||||
- 记录
|
|
||||||
- 学习
|
|
||||||
- 基础
|
|
||||||
dir:
|
|
||||||
order: 2
|
|
||||||
---
|
|
||||||
|
|
||||||
<Catalog />
|
|
||||||
|
|
@ -1,13 +0,0 @@
|
||||||
# 标记过时方法
|
|
||||||
|
|
||||||
## JavaScript:
|
|
||||||
在JavaScript中,通常会在方法的注释中明确说明该方法不推荐使用,并提供替代方法的建议。
|
|
||||||
|
|
||||||
```javascript
|
|
||||||
/**
|
|
||||||
* @deprecated This method is not recommended. Use newMethod() instead.
|
|
||||||
*/
|
|
||||||
function notRecommendedMethod() {
|
|
||||||
// 方法实现
|
|
||||||
}
|
|
||||||
```
|
|
||||||
|
|
@ -1,19 +0,0 @@
|
||||||
# 精度丢失问题
|
|
||||||
|
|
||||||
## IEEE 754 标准
|
|
||||||
+ **二进制浮点数**:IEEE 754 标准使用二进制表示浮点数,某些十进制小数无法精确转换为二进制,导致精度丢失。
|
|
||||||
+ **有限位数**:浮点数的位数有限,无法精确表示所有小数,尤其在涉及大数或小数时。
|
|
||||||
|
|
||||||
## JavaScript 中的精度丢失
|
|
||||||
+ **动态类型**:JavaScript 只有一种数字类型 `Number`,采用双精度浮点数(64位),容易在计算中出现精度问题。
|
|
||||||
+ **示例**:
|
|
||||||
|
|
||||||
```javascript
|
|
||||||
console.log(0.1 + 0.2); // 输出 0.30000000000000004
|
|
||||||
```
|
|
||||||
|
|
||||||
## 解决方案
|
|
||||||
+ **高精度库**: `BigNumber.js`(JavaScript)等库。
|
|
||||||
+ **整数运算**:将小数转换为整数进行计算,最后再转换回小数。
|
|
||||||
+ **格式化输出**:通过格式化控制小数位数,减少显示问题。
|
|
||||||
|
|
||||||
|
|
@ -1,13 +0,0 @@
|
||||||
---
|
|
||||||
title: 基础笔记
|
|
||||||
index: false
|
|
||||||
icon: guidance:study-room
|
|
||||||
headerDepth: 4
|
|
||||||
category:
|
|
||||||
- 笔记
|
|
||||||
- 记录
|
|
||||||
- 学习
|
|
||||||
- 基础
|
|
||||||
---
|
|
||||||
|
|
||||||
<Catalog />
|
|
||||||
|
Before Width: | Height: | Size: 30 KiB |
|
Before Width: | Height: | Size: 31 KiB |
|
Before Width: | Height: | Size: 67 KiB |
|
Before Width: | Height: | Size: 39 KiB |
|
Before Width: | Height: | Size: 16 KiB |
|
Before Width: | Height: | Size: 13 KiB |
|
Before Width: | Height: | Size: 32 KiB |
|
Before Width: | Height: | Size: 6.9 KiB |
|
Before Width: | Height: | Size: 18 KiB |
|
Before Width: | Height: | Size: 15 KiB |
|
Before Width: | Height: | Size: 21 KiB |
|
Before Width: | Height: | Size: 14 KiB |
|
Before Width: | Height: | Size: 22 KiB |
|
Before Width: | Height: | Size: 29 KiB |
|
Before Width: | Height: | Size: 13 KiB |
|
Before Width: | Height: | Size: 27 KiB |
|
Before Width: | Height: | Size: 16 KiB |
|
Before Width: | Height: | Size: 25 KiB |
|
Before Width: | Height: | Size: 38 KiB |
|
Before Width: | Height: | Size: 34 KiB |
|
Before Width: | Height: | Size: 16 KiB |
|
Before Width: | Height: | Size: 36 KiB |
|
Before Width: | Height: | Size: 21 KiB |
|
|
@ -1,87 +0,0 @@
|
||||||
# Auth环境
|
|
||||||
|
|
||||||
## 文件方式安装环境
|
|
||||||
|
|
||||||
使用docker-compose有的时候会因为版本不同,但是配置文件主要内容就是这些。需要注意版本问题
|
|
||||||
|
|
||||||
**mysql配置问题**
|
|
||||||
|
|
||||||
| **特性** | `**my.cnf**` | `**conf.d**` **目录** |
|
|
||||||
| ------------ | ---------------------------- | -------------------------- |
|
|
||||||
| **文件类型** | 单个文件 | 目录,包含多个 `.cnf` 文件 |
|
|
||||||
| **配置方式** | 集中式配置 | 分布式配置 |
|
|
||||||
| **优先级** | 高(覆盖 `conf.d` 中的配置) | 低(被 `my.cnf` 覆盖) |
|
|
||||||
| **适用场景** | 全局配置,核心配置 | 模块化配置,便于扩展和维护 |
|
|
||||||
|
|
||||||
------
|
|
||||||
|
|
||||||
```yaml
|
|
||||||
name: auth-dependence # 定义该配置的名称为 auth-dependence
|
|
||||||
services: # 定义服务列表
|
|
||||||
|
|
||||||
# 安装MySQL
|
|
||||||
mysql: # 定义 MySQL 服务
|
|
||||||
container_name: mysql_master # 容器名称为 mysql_master
|
|
||||||
image: mysql:8.0.33 # 使用 MySQL 8.0.33 版本的镜像
|
|
||||||
ports:
|
|
||||||
- "3306:3306" # 将宿主机的 3306 端口映射到容器的 3306 端口
|
|
||||||
environment:
|
|
||||||
- MYSQL_ROOT_PASSWORD=123456 # 设置 MySQL 的 root 用户密码为 123456
|
|
||||||
- TZ=Asia/Shanghai # 设置时区为亚洲/上海
|
|
||||||
volumes:
|
|
||||||
# - ~/docker/docker_data/mysql/mysql_master/etc/my.cnf:/etc/my.cnf # 如果需要创建配置文件
|
|
||||||
- ~/docker/docker_data/mysql/mysql_master/etc/mysql:/etc/mysql/conf.d # 挂载 MySQL 配置文件目录
|
|
||||||
- ~/docker/docker_data/mysql/mysql_master/data:/var/lib/mysql # 挂载 MySQL 数据目录
|
|
||||||
- ~/docker/docker_data/mysql/mysql_master/backup:/backup # 挂载备份目录
|
|
||||||
command:
|
|
||||||
- "--log-bin=mysql-bin" # 启用二进制日志
|
|
||||||
- "--server-id=1" # 设置服务器 ID 为 1
|
|
||||||
- "--collation-server=utf8mb4_unicode_ci" # 设置默认的排序规则为 utf8mb4_unicode_ci
|
|
||||||
- "--character-set-server=utf8mb4" # 设置默认的字符集为 utf8mb4
|
|
||||||
- "--lower-case-table-names=1" # 设置表名存储为小写
|
|
||||||
restart: always # 设置容器总是自动重启
|
|
||||||
privileged: true # 赋予容器特权模式
|
|
||||||
networks:
|
|
||||||
- auth # 将 MySQL 服务加入到 auth 网络
|
|
||||||
|
|
||||||
# 安装Redis
|
|
||||||
redis: # 定义 Redis 服务
|
|
||||||
container_name: redis_master # 容器名称为 redis_master
|
|
||||||
image: redis:7.0.10 # 使用 Redis 7.0.10 版本的镜像
|
|
||||||
ports:
|
|
||||||
- "6379:6379" # 将宿主机的 6379 端口映射到容器的 6379 端口
|
|
||||||
volumes:
|
|
||||||
# - ~/docker/docker_data/redis_master/redis.conf:/etc/redis/redis.conf # 需要创建配置文件
|
|
||||||
- ~/docker/docker_data/redis_master:/etc/redis # 挂载 Redis 配置文件目录
|
|
||||||
- ~/docker/docker_data/redis_master/data:/data # 挂载 Redis 数据目录
|
|
||||||
command:
|
|
||||||
- "--appendonly yes" # 启用 AOF 持久化
|
|
||||||
- "--daemonize no" # 不以守护进程方式运行
|
|
||||||
- "--requirepass 123456" # 设置 Redis 访问密码为 123456
|
|
||||||
- "--tcp-keepalive 300" # 设置 TCP keepalive 时间为 300 秒
|
|
||||||
restart: always # 设置容器总是自动重启
|
|
||||||
networks:
|
|
||||||
- auth # 将 MySQL 服务加入到 auth 网络
|
|
||||||
|
|
||||||
# 安装 Minio
|
|
||||||
minio: # 定义 Minio 服务
|
|
||||||
image: minio/minio # 使用 Minio 官方镜像
|
|
||||||
container_name: minio_master # 容器名称为 minio_master
|
|
||||||
ports:
|
|
||||||
- "9000:9000" # 将宿主机的 9000 端口映射到容器的 9000 端口
|
|
||||||
- "9090:9090" # 将宿主机的 9090 端口映射到容器的 9090 端口
|
|
||||||
volumes:
|
|
||||||
- ~/docker/docker_data/minio/data:/data # 挂载 Minio 数据目录
|
|
||||||
environment:
|
|
||||||
- MINIO_ROOT_USER=bunny # 设置 Minio 的 root 用户名为 bunny
|
|
||||||
- MINIO_ROOT_PASSWORD=02120212 # 设置 Minio 的 root 用户密码为 02120212
|
|
||||||
command: "server /data --console-address :9090" # 启动 Minio 服务并指定控制台地址
|
|
||||||
restart: always # 设置容器总是自动重启
|
|
||||||
networks:
|
|
||||||
- auth # 将 MySQL 服务加入到 auth 网络
|
|
||||||
|
|
||||||
networks: # 定义网络
|
|
||||||
auth: # 定义名为 auth 的网络
|
|
||||||
name: auth # 网络名称为 auth
|
|
||||||
driver: bridge # 使用 bridge 驱动(默认)
|
|
||||||
```
|
|
||||||
|
|
@ -1,63 +0,0 @@
|
||||||
---
|
|
||||||
title: Docker-Compose
|
|
||||||
index: true
|
|
||||||
icon: catppuccin:docker-compose
|
|
||||||
headerDepth: 4
|
|
||||||
category:
|
|
||||||
- 笔记
|
|
||||||
- 记录
|
|
||||||
- 学习
|
|
||||||
- Dcker
|
|
||||||
- Dcker-Compose
|
|
||||||
dir:
|
|
||||||
order: 2
|
|
||||||
---
|
|
||||||
|
|
||||||
<Catalog />
|
|
||||||
|
|
||||||
## docker-compose
|
|
||||||
|
|
||||||
**安装docker-compose,或者安装最新的docker,之后使用**`**docker compose up -d**`
|
|
||||||
|
|
||||||
### Rocky、Centos
|
|
||||||
|
|
||||||
```shell
|
|
||||||
sudo yum install docker-ce docker-ce-cli containerd.io
|
|
||||||
|
|
||||||
sudo yum install curl
|
|
||||||
curl -L https://get.daocloud.io/docker/compose/releases/download/1.25.4/docker-compose-`uname -s`-`uname -m` > /usr/local/bin/docker-compose
|
|
||||||
|
|
||||||
sudo chmod +x /usr/local/bin/docker-compose
|
|
||||||
|
|
||||||
sudo docker-compose --version
|
|
||||||
```
|
|
||||||
|
|
||||||
### Ubuntu
|
|
||||||
|
|
||||||
```bash
|
|
||||||
sudo apt install docker-compose
|
|
||||||
```
|
|
||||||
|
|
||||||
## docker-compose命令
|
|
||||||
|
|
||||||
### 只拉取镜像
|
|
||||||
|
|
||||||
docker-compose pull 命令会拉取 docker-compose.yml 文件中定义的所有服务的镜像,但不会创建或启动容器。
|
|
||||||
|
|
||||||
```bash
|
|
||||||
docker-compose pull
|
|
||||||
```
|
|
||||||
|
|
||||||
### 拉取镜像而不做其他操作
|
|
||||||
|
|
||||||
只拉取镜像而不做其他操作,可以结合 docker-compose 的其他命令来实现:
|
|
||||||
|
|
||||||
```bash
|
|
||||||
docker-compose up --no-start
|
|
||||||
```
|
|
||||||
|
|
||||||
### 拉取镜像并创建容器
|
|
||||||
|
|
||||||
```bash
|
|
||||||
docker-compose up -d
|
|
||||||
```
|
|
||||||
|
|
@ -1,280 +0,0 @@
|
||||||
# 基础微服务
|
|
||||||
|
|
||||||
## 文件方式安装环境
|
|
||||||
|
|
||||||
使用docker-compose有的时候会因为版本不同,但是配置文件主要内容就是这些。需要注意版本问题
|
|
||||||
|
|
||||||
### mysql配置问题
|
|
||||||
| **特性** | `**my.cnf**` | `**conf.d**`<br/>** ****目录** |
|
|
||||||
| --- | --- | --- |
|
|
||||||
| **<font style="color:rgb(64, 64, 64);">文件类型</font>** | <font style="color:rgb(64, 64, 64);">单个文件</font> | <font style="color:rgb(64, 64, 64);">目录,包含多个</font><font style="color:rgb(64, 64, 64);"> </font>`<font style="color:rgb(64, 64, 64);">.cnf</font>`<br/><font style="color:rgb(64, 64, 64);"> </font><font style="color:rgb(64, 64, 64);">文件</font> |
|
|
||||||
| **<font style="color:rgb(64, 64, 64);">配置方式</font>** | <font style="color:rgb(64, 64, 64);">集中式配置</font> | <font style="color:rgb(64, 64, 64);">分布式配置</font> |
|
|
||||||
| **<font style="color:rgb(64, 64, 64);">优先级</font>** | <font style="color:rgb(64, 64, 64);">高(覆盖</font><font style="color:rgb(64, 64, 64);"> </font>`<font style="color:rgb(64, 64, 64);">conf.d</font>`<br/><font style="color:rgb(64, 64, 64);"> </font><font style="color:rgb(64, 64, 64);">中的配置)</font> | <font style="color:rgb(64, 64, 64);">低(被</font><font style="color:rgb(64, 64, 64);"> </font>`<font style="color:rgb(64, 64, 64);">my.cnf</font>`<br/><font style="color:rgb(64, 64, 64);"> </font><font style="color:rgb(64, 64, 64);">覆盖)</font> |
|
|
||||||
| **<font style="color:rgb(64, 64, 64);">适用场景</font>** | <font style="color:rgb(64, 64, 64);">全局配置,核心配置</font> | <font style="color:rgb(64, 64, 64);">模块化配置,便于扩展和维护</font> |
|
|
||||||
|
|
||||||
|
|
||||||
### MongoDB配置
|
|
||||||
```bash
|
|
||||||
sudo mkdir -p ~/docker/docker_data/mongo/conf
|
|
||||||
sudo mkdir -p ~/docker/docker_data/mongo/logs
|
|
||||||
sudo chmod 777 ~/docker/docker_data/mongo/logs
|
|
||||||
sudo chmod 777 ~/docker/docker_data/mongo/conf
|
|
||||||
|
|
||||||
cd ~/docker/docker_data/mongo/logs
|
|
||||||
sudo touch mongod.log
|
|
||||||
sudo chmod 777 mongod.log
|
|
||||||
|
|
||||||
cd ~/docker/docker_data/mongo/conf
|
|
||||||
sudo vim mongod.conf
|
|
||||||
|
|
||||||
cd ~
|
|
||||||
```
|
|
||||||
|
|
||||||
#### 配置文件
|
|
||||||
```bash
|
|
||||||
# 数据库文件存储位置
|
|
||||||
dbpath = /data/db
|
|
||||||
# log文件存储位置
|
|
||||||
logpath = /data/log/mongod.log
|
|
||||||
# 使用追加的方式写日志
|
|
||||||
logappend = true
|
|
||||||
# 是否以守护进程方式运行
|
|
||||||
# fork = true
|
|
||||||
# 全部ip可以访问
|
|
||||||
bind_ip = 0.0.0.0
|
|
||||||
# 端口号
|
|
||||||
port = 27017
|
|
||||||
# 是否启用认证
|
|
||||||
auth = true
|
|
||||||
# 设置oplog的大小(MB)
|
|
||||||
oplogSize=2048
|
|
||||||
```
|
|
||||||
|
|
||||||
#### 设置账户密码
|
|
||||||
```shell
|
|
||||||
#进入容器
|
|
||||||
docker exec -it mongodb /bin/bash
|
|
||||||
|
|
||||||
#进入mongodb shell
|
|
||||||
mongosh --port 27017
|
|
||||||
|
|
||||||
#切换到admin库
|
|
||||||
use admin
|
|
||||||
|
|
||||||
#创建账号/密码
|
|
||||||
db.createUser({ user: 'admin', pwd: '02120212', roles: [ { role: "root", db: "admin" } ] });
|
|
||||||
# db.createUser({ user: 'admin', pwd: '123456', roles: [ { role: "userAdminAnyDatabase", db: "admin" } ] });
|
|
||||||
```
|
|
||||||
|
|
||||||
## docker-compose.yml
|
|
||||||
```yaml
|
|
||||||
name: cloud-dependence
|
|
||||||
services:
|
|
||||||
mysql:
|
|
||||||
container_name: mysql_master
|
|
||||||
image: mysql:8.0.33
|
|
||||||
ports:
|
|
||||||
- "3306:3306"
|
|
||||||
environment:
|
|
||||||
- MYSQL_ROOT_PASSWORD=123456
|
|
||||||
- TZ=Asia/Shanghai
|
|
||||||
volumes:
|
|
||||||
# - ~/docker/docker_data/mysql/mysql_master/etc/my.cnf:/etc/my.cnf # 如果需要创建配置文件
|
|
||||||
- ~/docker/docker_data/mysql/mysql_master/etc/mysql:/etc/mysql/conf.d
|
|
||||||
- ~/docker/docker_data/mysql/mysql_master/data:/var/lib/mysql
|
|
||||||
- ~/docker/docker_data/mysql/mysql_master/backup:/backup
|
|
||||||
command:
|
|
||||||
- "--log-bin=mysql-bin"
|
|
||||||
- "--server-id=1"
|
|
||||||
- "--collation-server=utf8mb4_unicode_ci"
|
|
||||||
- "--character-set-server=utf8mb4"
|
|
||||||
- "--lower-case-table-names=1"
|
|
||||||
restart: always
|
|
||||||
privileged: true
|
|
||||||
networks:
|
|
||||||
- cloud
|
|
||||||
|
|
||||||
redis:
|
|
||||||
container_name: redis_master
|
|
||||||
image: redis:7.0.10
|
|
||||||
ports:
|
|
||||||
- "6379:6379"
|
|
||||||
volumes:
|
|
||||||
# - ~/docker/docker_data/redis_master/redis.conf:/etc/redis/redis.conf # 需要创建配置文件
|
|
||||||
- ~/docker/docker_data/redis_master:/etc/redis # 之后要配置文件可以直接在这里创建 redis.conf
|
|
||||||
- ~/docker/docker_data/redis_master/data:/data
|
|
||||||
command:
|
|
||||||
- "--appendonly yes"
|
|
||||||
- "--daemonize no"
|
|
||||||
- "--requirepass 123456"
|
|
||||||
- "--tcp-keepalive 300"
|
|
||||||
restart: always
|
|
||||||
networks:
|
|
||||||
- cloud
|
|
||||||
|
|
||||||
minio:
|
|
||||||
image: minio/minio
|
|
||||||
container_name: minio_master
|
|
||||||
ports:
|
|
||||||
- "9000:9000"
|
|
||||||
- "9090:9090"
|
|
||||||
volumes:
|
|
||||||
- ~/docker/docker_data/minio/data:/data
|
|
||||||
environment:
|
|
||||||
- MINIO_ROOT_USER=bunny
|
|
||||||
- MINIO_ROOT_PASSWORD=02120212
|
|
||||||
command: "server /data --console-address :9090"
|
|
||||||
restart: always
|
|
||||||
networks:
|
|
||||||
- cloud
|
|
||||||
|
|
||||||
mongodb:
|
|
||||||
image: mongo:latest
|
|
||||||
container_name: mongodb
|
|
||||||
restart: always
|
|
||||||
privileged: true
|
|
||||||
ports:
|
|
||||||
- "27017:27017"
|
|
||||||
volumes:
|
|
||||||
- ~/docker/docker_data/mongo/data:/data/db
|
|
||||||
- ~/docker/docker_data/mongo/conf:/data/configdb
|
|
||||||
- ~/docker/docker_data/mongo/logs:/data/log
|
|
||||||
command: "mongod --config /data/configdb/mongod.conf"
|
|
||||||
networks:
|
|
||||||
- cloud
|
|
||||||
|
|
||||||
nacos:
|
|
||||||
image: nacos/nacos-server:v2.4.3
|
|
||||||
container_name: nacos
|
|
||||||
ports:
|
|
||||||
- "8848:8848"
|
|
||||||
- "9848:9848"
|
|
||||||
environment:
|
|
||||||
- MODE=standalone
|
|
||||||
restart: always
|
|
||||||
networks:
|
|
||||||
- cloud
|
|
||||||
|
|
||||||
sentinel:
|
|
||||||
image: bladex/sentinel-dashboard:1.8.8
|
|
||||||
container_name: sentinel
|
|
||||||
ports:
|
|
||||||
- "8858:8858"
|
|
||||||
privileged: true
|
|
||||||
restart: always
|
|
||||||
networks:
|
|
||||||
- cloud
|
|
||||||
|
|
||||||
seata-server:
|
|
||||||
image: apache/seata-server:2.3.0.jdk21
|
|
||||||
container_name: seata-server
|
|
||||||
ports:
|
|
||||||
- "8091:8091"
|
|
||||||
restart: always
|
|
||||||
networks:
|
|
||||||
- cloud
|
|
||||||
|
|
||||||
networks: # 定义网络
|
|
||||||
cloud: # 定义名为 auth 的网络
|
|
||||||
name: cloud # 网络名称为 auth
|
|
||||||
driver: bridge # 使用 bridge 驱动(默认)
|
|
||||||
```
|
|
||||||
|
|
||||||
## 拉取镜像模板
|
|
||||||
```yaml
|
|
||||||
name: cloud-dependence
|
|
||||||
services:
|
|
||||||
mysql:
|
|
||||||
container_name: mysql_master
|
|
||||||
image: mysql:8.0.33
|
|
||||||
ports:
|
|
||||||
- "3306:3306"
|
|
||||||
environment:
|
|
||||||
- MYSQL_ROOT_PASSWORD=123456
|
|
||||||
- TZ=Asia/Shanghai
|
|
||||||
volumes:
|
|
||||||
# - ~/docker/docker_data/mysql/mysql_master/etc/my.cnf:/etc/my.cnf # 如果需要创建配置文件
|
|
||||||
- ~/docker/docker_data/mysql/mysql_master/etc/mysql:/etc/mysql/conf.d
|
|
||||||
- ~/docker/docker_data/mysql/mysql_master/data:/var/lib/mysql
|
|
||||||
- ~/docker/docker_data/mysql/mysql_master/backup:/backup
|
|
||||||
command:
|
|
||||||
- "--log-bin=mysql-bin"
|
|
||||||
- "--server-id=1"
|
|
||||||
- "--collation-server=utf8mb4_unicode_ci"
|
|
||||||
- "--character-set-server=utf8mb4"
|
|
||||||
- "--lower-case-table-names=1"
|
|
||||||
restart: always
|
|
||||||
privileged: true
|
|
||||||
|
|
||||||
redis:
|
|
||||||
container_name: redis_master
|
|
||||||
image: redis:7.0.10
|
|
||||||
ports:
|
|
||||||
- "6379:6379"
|
|
||||||
volumes:
|
|
||||||
# - ~/docker/docker_data/redis_master/redis.conf:/etc/redis/redis.conf # 需要创建配置文件
|
|
||||||
- ~/docker/docker_data/redis_master:/etc/redis # 之后要配置文件可以直接在这里创建 redis.conf
|
|
||||||
- ~/docker/docker_data/redis_master/data:/data
|
|
||||||
command:
|
|
||||||
- "--appendonly yes"
|
|
||||||
- "--daemonize no"
|
|
||||||
- "--requirepass 123456"
|
|
||||||
- "--tcp-keepalive 300"
|
|
||||||
restart: always
|
|
||||||
|
|
||||||
minio:
|
|
||||||
image: minio/minio
|
|
||||||
container_name: minio_master
|
|
||||||
ports:
|
|
||||||
- "9000:9000"
|
|
||||||
- "9090:9090"
|
|
||||||
volumes:
|
|
||||||
- ~/docker/docker_data/minio/data:/data
|
|
||||||
environment:
|
|
||||||
- MINIO_ROOT_USER=bunny
|
|
||||||
- MINIO_ROOT_PASSWORD=02120212
|
|
||||||
command: "server /data --console-address :9090"
|
|
||||||
restart: always
|
|
||||||
|
|
||||||
mongodb:
|
|
||||||
image: mongo:latest
|
|
||||||
container_name: mongodb
|
|
||||||
restart: always
|
|
||||||
privileged: true
|
|
||||||
ports:
|
|
||||||
- "27017:27017"
|
|
||||||
volumes:
|
|
||||||
- ~/docker/docker_data/mongo/data:/data/db
|
|
||||||
- ~/docker/docker_data/mongo/conf:/data/configdb
|
|
||||||
- ~/docker/docker_data/mongo/logs:/data/log
|
|
||||||
command: "mongod --config /data/configdb/mongod.conf"
|
|
||||||
|
|
||||||
nacos:
|
|
||||||
image: nacos/nacos-server:v2.4.3
|
|
||||||
container_name: nacos
|
|
||||||
ports:
|
|
||||||
- "8848:8848"
|
|
||||||
- "9848:9848"
|
|
||||||
environment:
|
|
||||||
- MODE=standalone
|
|
||||||
restart: always
|
|
||||||
|
|
||||||
sentinel:
|
|
||||||
image: bladex/sentinel-dashboard:1.8.8
|
|
||||||
container_name: sentinel
|
|
||||||
ports:
|
|
||||||
- "8858:8858"
|
|
||||||
privileged: true
|
|
||||||
restart: always
|
|
||||||
|
|
||||||
seata-server:
|
|
||||||
image: apache/seata-server:2.3.0.jdk21
|
|
||||||
container_name: seata-server
|
|
||||||
ports:
|
|
||||||
- "8091:8091"
|
|
||||||
restart: always
|
|
||||||
|
|
||||||
opendjdk:
|
|
||||||
image: openjdk:24-ea-17-jdk-oraclelinux9
|
|
||||||
```
|
|
||||||
|
|
||||||
|
|
@ -1,38 +0,0 @@
|
||||||
# Docker镜像源
|
|
||||||
```bash
|
|
||||||
# 创建目录
|
|
||||||
sudo mkdir -p /etc/docker
|
|
||||||
|
|
||||||
# 写入配置文件
|
|
||||||
sudo tee /etc/docker/daemon.json <<-'EOF'
|
|
||||||
{
|
|
||||||
"registry-mirrors": [
|
|
||||||
"https://docker-0.unsee.tech",
|
|
||||||
"https://docker-cf.registry.cyou",
|
|
||||||
"https://docker.1panel.live",
|
|
||||||
"https://registry.dockermirror.com",
|
|
||||||
"https://docker.imgdb.de",
|
|
||||||
"https://docker.m.daocloud.io",
|
|
||||||
"https://hub.firefly.store",
|
|
||||||
"https://hub.littlediary.cn",
|
|
||||||
"https://hub.rat.dev",
|
|
||||||
"https://dhub.kubesre.xyz",
|
|
||||||
"https://cjie.eu.org",
|
|
||||||
"https://docker.kejilion.pro",
|
|
||||||
"https://docker.1panelproxy.com",
|
|
||||||
"https://docker.hlmirror.com",
|
|
||||||
"https://hub.fast360.xyz",
|
|
||||||
"https://dockerpull.cn",
|
|
||||||
"https://cr.laoyou.ip-ddns.com",
|
|
||||||
"https://docker.melikeme.cn",
|
|
||||||
"https://image.cloudlayer.icu",
|
|
||||||
"https://docker.tbedu.top"
|
|
||||||
]
|
|
||||||
}
|
|
||||||
|
|
||||||
EOF
|
|
||||||
|
|
||||||
# 重启docker服务
|
|
||||||
sudo systemctl daemon-reload && sudo systemctl restart docker
|
|
||||||
```
|
|
||||||
|
|
||||||
|
|
@ -1,39 +0,0 @@
|
||||||
# Centos中配置
|
|
||||||
|
|
||||||
## Centos
|
|
||||||
|
|
||||||
### 更新库
|
|
||||||
```shell
|
|
||||||
cd /etc/yum.repos.d/
|
|
||||||
sed -i 's/mirrorlist/#mirrorlist/g' /etc/yum.repos.d/CentOS-*
|
|
||||||
|
|
||||||
sed -i 's|#baseurl=http://mirror.centos.org|baseurl=http://vault.centos.org|g' /etc/yum.repos.d/CentOS-*
|
|
||||||
wget -O /etc/yum.repos.d/CentOS-Base.repo https://mirrors.aliyun.com/repo/Centos-vault-8.5.2111.repo
|
|
||||||
|
|
||||||
yum clean all
|
|
||||||
|
|
||||||
yum makecache
|
|
||||||
|
|
||||||
yum update
|
|
||||||
```
|
|
||||||
|
|
||||||
### 安装docker
|
|
||||||
```shell
|
|
||||||
yum install -y yum-utils device-mapper-persistent-data lvm2
|
|
||||||
sudo yum-config-manager --add-repo http://mirrors.aliyun.com/docker-ce/linux/centos/docker-ce.repo
|
|
||||||
yum list docker-ce --showduplicates | sort -r
|
|
||||||
yum -y install docker-ce.x86_64 --allowerasing
|
|
||||||
sudo yum install docker-ce docker-ce-cli containerd.io docker-buildx-plugin docker-compose-plugin
|
|
||||||
sudo systemctl enable docker --now
|
|
||||||
docker ps
|
|
||||||
```
|
|
||||||
|
|
||||||
### docker初始化
|
|
||||||
```shell
|
|
||||||
systemctl start docker
|
|
||||||
systemctl enable docker
|
|
||||||
systemctl status docker
|
|
||||||
```
|
|
||||||
|
|
||||||
[Docker镜像源](https://www.yuque.com/bunny-6ixda/bgxtva/xgb6hambt3u6r5e6)
|
|
||||||
|
|
||||||
|
|
@ -1,30 +0,0 @@
|
||||||
---
|
|
||||||
title: 安装Docker
|
|
||||||
index: true
|
|
||||||
icon: devicon:docker-wordmark
|
|
||||||
headerDepth: 4
|
|
||||||
category:
|
|
||||||
- 笔记
|
|
||||||
- 记录
|
|
||||||
- 学习
|
|
||||||
- Docker
|
|
||||||
- 安装
|
|
||||||
dir:
|
|
||||||
order: 1
|
|
||||||
---
|
|
||||||
|
|
||||||
<Catalog />
|
|
||||||
|
|
||||||
## docker-compose
|
|
||||||
|
|
||||||
```shell
|
|
||||||
sudo yum install docker-ce docker-ce-cli containerd.io
|
|
||||||
|
|
||||||
sudo yum install curl
|
|
||||||
curl -L https://get.daocloud.io/docker/compose/releases/download/1.25.4/docker-compose-`uname -s`-`uname -m` > /usr/local/bin/docker-compose
|
|
||||||
|
|
||||||
sudo chmod +x /usr/local/bin/docker-compose
|
|
||||||
|
|
||||||
sudo docker-compose --version
|
|
||||||
```
|
|
||||||
|
|
||||||
|
|
@ -1,74 +0,0 @@
|
||||||
# Ubuntu中配置
|
|
||||||
|
|
||||||
## Ubuntu环境搭建
|
|
||||||
|
|
||||||
```shell
|
|
||||||
sudo apt-get remove docker docker-engine docker.io containerd runc
|
|
||||||
sudo apt update
|
|
||||||
sudo apt upgrade
|
|
||||||
sudo apt-get install ca-certificates curl gnupg lsb-release
|
|
||||||
# 添加Docker官方GPG密钥
|
|
||||||
sudo curl -fsSL http://mirrors.aliyun.com/docker-ce/linux/ubuntu/gpg | sudo apt-key add -
|
|
||||||
sudo add-apt-repository "deb [arch=amd64] http://mirrors.aliyun.com/docker-ce/linux/ubuntu $(lsb_release -cs) stable"
|
|
||||||
# 安装docker
|
|
||||||
sudo apt-get install docker-ce docker-ce-cli containerd.io
|
|
||||||
# 默认情况下,只有root用户和docker组的用户才能运行Docker命令。我们可以将当前用户添加到docker组,以避免每次使用Docker时都需要使用sudo,设置完成后退出当前用户之后再进入既可
|
|
||||||
sudo usermod -aG docker $USER
|
|
||||||
# 运行docker
|
|
||||||
sudo systemctl start docker
|
|
||||||
# 安装工具
|
|
||||||
sudo apt-get -y install apt-transport-https ca-certificates curl software-properties-common
|
|
||||||
# 重启docker
|
|
||||||
sudo service docker restart
|
|
||||||
```
|
|
||||||
|
|
||||||
> 避免每次操作都要输入`sudo`
|
|
||||||
>
|
|
||||||
|
|
||||||
```bash
|
|
||||||
# 创建分组一般
|
|
||||||
sudo groupadd docker
|
|
||||||
# 将当前用户添加到分组
|
|
||||||
sudo usermod -aG docker $USER
|
|
||||||
# 重启终端生效
|
|
||||||
exit
|
|
||||||
```
|
|
||||||
|
|
||||||
## 安装docker内容
|
|
||||||
```bash
|
|
||||||
sudo mkdir /etc/docker
|
|
||||||
sudo touch /etc/docker/daemon.json
|
|
||||||
sudo chmod 777 /etc/docker/daemon.json
|
|
||||||
sudo vim /etc/docker/daemon.json
|
|
||||||
```
|
|
||||||
|
|
||||||
**必要的 deaemon.json**
|
|
||||||
|
|
||||||
镜像源会过期:[Docker镜像源](https://www.yuque.com/bunny-6ixda/bgxtva/rh4mkvzegfumrncg)
|
|
||||||
|
|
||||||
```json
|
|
||||||
{
|
|
||||||
"registry-mirrors": [
|
|
||||||
"https://docker.unsee.tech",
|
|
||||||
"https://docker.1panel.live",
|
|
||||||
"https:\/\/jockerhub.com",
|
|
||||||
"https://dockerhub.icu",
|
|
||||||
"https://docker.1panel.live",
|
|
||||||
"https://gwsg6nw9.mirror.aliyuncs.com",
|
|
||||||
"https://registry.docker-cn.com",
|
|
||||||
"http://hub-mirror.c.163.com",
|
|
||||||
"http://f1361db2.m.daocloud.io",
|
|
||||||
"https://mirror.ccs.tencentyun.com",
|
|
||||||
"https://phtv51hj.mirror.aliyuncs.com",
|
|
||||||
"https://gwsg6nw9.mirror.aliyuncs.com"
|
|
||||||
]
|
|
||||||
}
|
|
||||||
```
|
|
||||||
|
|
||||||
重启docker
|
|
||||||
|
|
||||||
```bash
|
|
||||||
sudo systemctl restart docker.socket
|
|
||||||
```
|
|
||||||
|
|
||||||
##
|
|
||||||
|
|
@ -1,13 +0,0 @@
|
||||||
---
|
|
||||||
title: Docker笔记
|
|
||||||
index: false
|
|
||||||
icon: vscode-icons:file-type-docker
|
|
||||||
headerDepth: 4
|
|
||||||
category:
|
|
||||||
- 笔记
|
|
||||||
- 记录
|
|
||||||
- 学习
|
|
||||||
- Docker
|
|
||||||
---
|
|
||||||
|
|
||||||
<Catalog />
|
|
||||||
|
|
@ -1,13 +0,0 @@
|
||||||
---
|
|
||||||
title: Git笔记
|
|
||||||
index: true
|
|
||||||
icon: iconoir:git
|
|
||||||
headerDepth: 4
|
|
||||||
category:
|
|
||||||
- 笔记
|
|
||||||
- 记录
|
|
||||||
- 学习
|
|
||||||
- Git
|
|
||||||
---
|
|
||||||
|
|
||||||
<Catalog />
|
|
||||||
|
|
@ -1,35 +0,0 @@
|
||||||
# IDEA相关配置
|
|
||||||
|
|
||||||
## IDEA注释设置:单行或多行注释规则(不显示在行首)
|
|
||||||
|
|
||||||
进入 Settings -> Code Style -> Java ,在右边选择 “Code Generation” Tab,然后找到 Comment Code 那块,把
|
|
||||||
|
|
||||||
- 任务列表Line comment at first column
|
|
||||||
- 任务列表Block comment at first column
|
|
||||||
- 任务列表,去掉前面两个的复选框
|
|
||||||
|
|
||||||
`Line comment at first column`单行注释顶格
|
|
||||||
`Add a space at comment start` 注释前添加空格
|
|
||||||
|
|
||||||
`Block comment at first column`多行注释顶格
|
|
||||||
java或者选择你想要修改方式的文件
|
|
||||||
|
|
||||||

|
|
||||||
|
|
||||||
## Intellij配置自动导入包
|
|
||||||
|
|
||||||
找到设置
|
|
||||||
|
|
||||||

|
|
||||||
|
|
||||||
将下面这两项打勾,这样每次就可以自动导入包了
|
|
||||||
|
|
||||||

|
|
||||||
|
|
||||||
## Intellij IDE 中复制多个服务
|
|
||||||
|
|
||||||

|
|
||||||
|
|
||||||
添加此选项
|
|
||||||
|
|
||||||

|
|
||||||
|
|
@ -1,14 +0,0 @@
|
||||||
---
|
|
||||||
title: 编辑器笔记
|
|
||||||
index: true
|
|
||||||
icon: skill-icons:idea-light
|
|
||||||
headerDepth: 4
|
|
||||||
category:
|
|
||||||
- 笔记
|
|
||||||
- 记录
|
|
||||||
- 学习
|
|
||||||
- 编辑器
|
|
||||||
- IDE
|
|
||||||
---
|
|
||||||
|
|
||||||
<Catalog />
|
|
||||||
|
|
@ -1,11 +0,0 @@
|
||||||
# Vscode自动移出不用的包
|
|
||||||
在Vscode中删除不用的包、Vscode移出不用的包、Vscode移出不用的import包
|
|
||||||
|
|
||||||
找到`setting.json`(在字体设置里面),添加如下配置
|
|
||||||
|
|
||||||
```json
|
|
||||||
"editor.codeActionsOnSave": { "source.organizeImports": true }, // 删除不用的包
|
|
||||||
```
|
|
||||||
|
|
||||||
在保存时,自动清除不需要的包
|
|
||||||
|
|
||||||
|
Before Width: | Height: | Size: 144 KiB |
|
Before Width: | Height: | Size: 83 KiB |
|
Before Width: | Height: | Size: 78 KiB |
|
Before Width: | Height: | Size: 76 KiB |
|
Before Width: | Height: | Size: 278 KiB |
|
|
@ -1,11 +1,4 @@
|
||||||
---
|
|
||||||
icon: ri:java-fill
|
|
||||||
---
|
|
||||||
|
|
||||||
# JavaStream
|
|
||||||
|
|
||||||
## 创建Stream
|
## 创建Stream
|
||||||
|
|
||||||
### Stream.builder()创建
|
### Stream.builder()创建
|
||||||
```java
|
```java
|
||||||
Stream<Integer> build = Stream.<Integer>builder()
|
Stream<Integer> build = Stream.<Integer>builder()
|
||||||
|
|
|
||||||
|
|
@ -1,5 +1,3 @@
|
||||||
# Java返回Result
|
|
||||||
|
|
||||||
```java
|
```java
|
||||||
import com.alibaba.fastjson2.annotation.JSONField;
|
import com.alibaba.fastjson2.annotation.JSONField;
|
||||||
import com.fasterxml.jackson.annotation.JsonFormat;
|
import com.fasterxml.jackson.annotation.JsonFormat;
|
||||||
|
|
@ -1,13 +0,0 @@
|
||||||
---
|
|
||||||
title: Java笔记
|
|
||||||
index: false
|
|
||||||
icon: devicon:java-wordmark
|
|
||||||
headerDepth: 4
|
|
||||||
category:
|
|
||||||
- 笔记
|
|
||||||
- 记录
|
|
||||||
- 学习
|
|
||||||
- Java
|
|
||||||
---
|
|
||||||
|
|
||||||
<Catalog />
|
|
||||||
|
|
@ -1,5 +1,3 @@
|
||||||
# Ant风格访问
|
|
||||||
|
|
||||||
Spring MVC 支持 **Ant 风格**(Ant-style path matching)主要体现在 URL 路径匹配模式上。这种模式是 Spring Web 框架用来进行 URL 模式匹配的一种方式,借用了 Apache Ant(一个流行的 Java 构建工具)中的路径匹配规则。Ant 风格的路径匹配使得 URL 路径映射更加灵活和方便。
|
Spring MVC 支持 **Ant 风格**(Ant-style path matching)主要体现在 URL 路径匹配模式上。这种模式是 Spring Web 框架用来进行 URL 模式匹配的一种方式,借用了 Apache Ant(一个流行的 Java 构建工具)中的路径匹配规则。Ant 风格的路径匹配使得 URL 路径映射更加灵活和方便。
|
||||||
|
|
||||||
+ `*` 匹配单一路径层级中的任意字符。
|
+ `*` 匹配单一路径层级中的任意字符。
|
||||||
|
|
|
||||||
|
|
@ -1,19 +1,3 @@
|
||||||
---
|
|
||||||
title: Spring笔记
|
|
||||||
index: true
|
|
||||||
icon: devicon:spring
|
|
||||||
category:
|
|
||||||
- 笔记
|
|
||||||
- 记录
|
|
||||||
- 学习
|
|
||||||
- Java
|
|
||||||
- Spring
|
|
||||||
|
|
||||||
dir:
|
|
||||||
order: 1
|
|
||||||
---
|
|
||||||
|
|
||||||
|
|
||||||
+ 公共AI网站:[https://chatgptplus.cn/](https://chatgptplus.cn/)
|
+ 公共AI网站:[https://chatgptplus.cn/](https://chatgptplus.cn/)
|
||||||
+ vue3官网:[https://cn.vuejs.org/](https://cn.vuejs.org/)
|
+ vue3官网:[https://cn.vuejs.org/](https://cn.vuejs.org/)
|
||||||
+ SpringBoot官网:[https://docs.spring.io/spring-boot/index.html](https://docs.spring.io/spring-boot/index.html)
|
+ SpringBoot官网:[https://docs.spring.io/spring-boot/index.html](https://docs.spring.io/spring-boot/index.html)
|
||||||
|
|
|
||||||
|
|
@ -1,78 +1,68 @@
|
||||||
# Spring 表单验证
|
## <font style="color:rgb(0, 0, 0);">Spring 表单验证</font>在 Spring MVC 中,表单验证是通过一系列的注解来完成的。
|
||||||
|
### `<font style="color:rgb(0, 0, 0);">@NotNull</font>`
|
||||||
## Spring 表单验证在 Spring MVC 中,表单验证是通过一系列的注解来完成的。
|
+ **作用**<font style="color:rgb(0, 0, 0);">:确保字段值不为空。</font>
|
||||||
|
+ **用法**<font style="color:rgb(0, 0, 0);">:用于字段、方法参数或返回值上,表示该字段不能为空。如果字段为空,将验证失败并返回相应的错误信息。</font>
|
||||||
### `@NotNull`
|
+ <font style="color:rgb(0, 0, 0);">示例</font>
|
||||||
|
|
||||||
- **作用**:确保字段值不为空。
|
|
||||||
- **用法**:用于字段、方法参数或返回值上,表示该字段不能为空。如果字段为空,将验证失败并返回相应的错误信息。
|
|
||||||
- 示例
|
|
||||||
|
|
||||||
```java
|
```java
|
||||||
@NotNull(message = "用户名不能为空")
|
@NotNull(message = "用户名不能为空")
|
||||||
private String username;
|
private String username;
|
||||||
```
|
```
|
||||||
|
|
||||||
### `@NotEmpty`
|
### `<font style="color:rgb(0, 0, 0);">@NotEmpty</font>`
|
||||||
|
+ **作用**<font style="color:rgb(0, 0, 0);">:确保字段不为空,并且不为一个空字符串。</font>
|
||||||
- **作用**:确保字段不为空,并且不为一个空字符串。
|
+ **用法**<font style="color:rgb(0, 0, 0);">:用于字符串、集合等类型,验证字段不仅不能为空,而且不能为空字符串。</font>
|
||||||
- **用法**:用于字符串、集合等类型,验证字段不仅不能为空,而且不能为空字符串。
|
+ <font style="color:rgb(0, 0, 0);">示例</font>
|
||||||
- 示例
|
|
||||||
|
|
||||||
```java
|
```java
|
||||||
@NotEmpty(message = "密码不能为空")
|
@NotEmpty(message = "密码不能为空")
|
||||||
private String password;
|
private String password;
|
||||||
```
|
```
|
||||||
|
|
||||||
### `@NotBlank`
|
### `<font style="color:rgb(0, 0, 0);">@NotBlank</font>`
|
||||||
|
+ **作用**<font style="color:rgb(0, 0, 0);">:确保字段不为空,并且不为一个空白字符串(即非空白字符)。</font>
|
||||||
- **作用**:确保字段不为空,并且不为一个空白字符串(即非空白字符)。
|
+ **用法**<font style="color:rgb(0, 0, 0);">:类似于 </font>`<font style="color:rgb(0, 0, 0);">@NotEmpty</font>`<font style="color:rgb(0, 0, 0);">,但除了不为空,还要求去除空白字符后不能为零长度。</font>
|
||||||
- **用法**:类似于 `@NotEmpty`,但除了不为空,还要求去除空白字符后不能为零长度。
|
+ <font style="color:rgb(0, 0, 0);">示例</font>
|
||||||
- 示例
|
|
||||||
|
|
||||||
```java
|
```java
|
||||||
@NotBlank(message = "电子邮件不能为空")
|
@NotBlank(message = "电子邮件不能为空")
|
||||||
private String email;
|
private String email;
|
||||||
```
|
```
|
||||||
|
|
||||||
### `@Size(min, max)`
|
### `<font style="color:rgb(0, 0, 0);">@Size(min, max)</font>`
|
||||||
|
+ **作用**<font style="color:rgb(0, 0, 0);">:验证字段的大小,适用于字符串、集合、数组等类型。</font>
|
||||||
- **作用**:验证字段的大小,适用于字符串、集合、数组等类型。
|
+ **用法**<font style="color:rgb(0, 0, 0);">:可以设置最小值和最大值来限制字段的长度或集合的大小。</font>
|
||||||
- **用法**:可以设置最小值和最大值来限制字段的长度或集合的大小。
|
+ <font style="color:rgb(0, 0, 0);">示例</font>
|
||||||
- 示例
|
|
||||||
|
|
||||||
```java
|
```java
|
||||||
@Size(min = 6, max = 20, message = "密码长度必须在6到20之间")
|
@Size(min = 6, max = 20, message = "密码长度必须在6到20之间")
|
||||||
private String password;
|
private String password;
|
||||||
```
|
```
|
||||||
|
|
||||||
### `@Email`
|
### `<font style="color:rgb(0, 0, 0);">@Email</font>`
|
||||||
|
+ **作用**<font style="color:rgb(0, 0, 0);">:验证字段是否符合有效的电子邮件格式。</font>
|
||||||
- **作用**:验证字段是否符合有效的电子邮件格式。
|
+ **用法**<font style="color:rgb(0, 0, 0);">:用于验证字符串字段是否为有效的电子邮件地址格式。</font>
|
||||||
- **用法**:用于验证字符串字段是否为有效的电子邮件地址格式。
|
+ <font style="color:rgb(0, 0, 0);">示例</font>
|
||||||
- 示例
|
|
||||||
|
|
||||||
```java
|
```java
|
||||||
@Email(message = "请输入有效的电子邮件地址")
|
@Email(message = "请输入有效的电子邮件地址")
|
||||||
private String email;
|
private String email;
|
||||||
```
|
```
|
||||||
|
|
||||||
### `@Pattern(regexp)`
|
### `<font style="color:rgb(0, 0, 0);">@Pattern(regexp)</font>`
|
||||||
|
+ **作用**<font style="color:rgb(0, 0, 0);">:根据正则表达式验证字段值。</font>
|
||||||
- **作用**:根据正则表达式验证字段值。
|
+ **用法**<font style="color:rgb(0, 0, 0);">:可以根据自定义的正则表达式来验证字段的内容。</font>
|
||||||
- **用法**:可以根据自定义的正则表达式来验证字段的内容。
|
+ <font style="color:rgb(0, 0, 0);">示例</font>
|
||||||
- 示例
|
|
||||||
|
|
||||||
```java
|
```java
|
||||||
@Pattern(regexp = "^\\d{10}$", message = "请输入有效的手机号码")
|
@Pattern(regexp = "^\\d{10}$", message = "请输入有效的手机号码")
|
||||||
private String phoneNumber;
|
private String phoneNumber;
|
||||||
```
|
```
|
||||||
|
|
||||||
### `@Min(value)` **和** `@Max(value)`
|
### `<font style="color:rgb(0, 0, 0);">@Min(value)</font>`** 和 **`<font style="color:rgb(0, 0, 0);">@Max(value)</font>`
|
||||||
|
+ **作用**<font style="color:rgb(0, 0, 0);">:确保数字类型字段的值在指定范围内。</font>
|
||||||
- **作用**:确保数字类型字段的值在指定范围内。
|
+ **用法**<font style="color:rgb(0, 0, 0);">:</font>`<font style="color:rgb(0, 0, 0);">@Min</font>`<font style="color:rgb(0, 0, 0);"> 用于验证值是否大于等于指定的最小值,</font>`<font style="color:rgb(0, 0, 0);">@Max</font>`<font style="color:rgb(0, 0, 0);"> 用于验证值是否小于等于指定的最大值。</font>
|
||||||
- **用法**:`@Min` 用于验证值是否大于等于指定的最小值,`@Max` 用于验证值是否小于等于指定的最大值。
|
+ <font style="color:rgb(0, 0, 0);">示例</font>
|
||||||
- 示例
|
|
||||||
|
|
||||||
```java
|
```java
|
||||||
@Min(value = 18, message = "年龄不能小于18岁")
|
@Min(value = 18, message = "年龄不能小于18岁")
|
||||||
|
|
@ -80,173 +70,158 @@ private String phoneNumber;
|
||||||
private int age;
|
private int age;
|
||||||
```
|
```
|
||||||
|
|
||||||
### `@DecimalMin(value)` **和** `@DecimalMax(value)`
|
### `<font style="color:rgb(0, 0, 0);">@DecimalMin(value)</font>`** 和 **`<font style="color:rgb(0, 0, 0);">@DecimalMax(value)</font>`
|
||||||
|
+ **作用**<font style="color:rgb(0, 0, 0);">:用于验证浮动值是否在指定范围内,类似于 </font>`<font style="color:rgb(0, 0, 0);">@Min</font>`<font style="color:rgb(0, 0, 0);"> 和 </font>`<font style="color:rgb(0, 0, 0);">@Max</font>`<font style="color:rgb(0, 0, 0);">,但适用于 </font>`<font style="color:rgb(0, 0, 0);">BigDecimal</font>`<font style="color:rgb(0, 0, 0);"> 或 </font>`<font style="color:rgb(0, 0, 0);">Double</font>`<font style="color:rgb(0, 0, 0);"> 类型的数值。</font>
|
||||||
- **作用**:用于验证浮动值是否在指定范围内,类似于 `@Min` 和 `@Max`,但适用于 `BigDecimal` 或 `Double` 类型的数值。
|
+ **用法**<font style="color:rgb(0, 0, 0);">:</font>`<font style="color:rgb(0, 0, 0);">@DecimalMin</font>`<font style="color:rgb(0, 0, 0);"> 验证值是否大于等于指定的最小值,</font>`<font style="color:rgb(0, 0, 0);">@DecimalMax</font>`<font style="color:rgb(0, 0, 0);"> 验证值是否小于等于指定的最大值。</font>
|
||||||
- **用法**:`@DecimalMin` 验证值是否大于等于指定的最小值,`@DecimalMax` 验证值是否小于等于指定的最大值。
|
+ <font style="color:rgb(0, 0, 0);">示例</font>
|
||||||
- 示例
|
|
||||||
|
|
||||||
```java
|
```java
|
||||||
@DecimalMin(value = "0.0", inclusive = true, message = "价格不能小于0")
|
@DecimalMin(value = "0.0", inclusive = true, message = "价格不能小于0")
|
||||||
private BigDecimal price;
|
private BigDecimal price;
|
||||||
```
|
```
|
||||||
|
|
||||||
### `@Future`
|
### `<font style="color:rgb(0, 0, 0);">@Future</font>`
|
||||||
|
+ **作用**<font style="color:rgb(0, 0, 0);">:验证日期字段的值是否为将来日期。</font>
|
||||||
- **作用**:验证日期字段的值是否为将来日期。
|
+ **用法**<font style="color:rgb(0, 0, 0);">:用于 </font>`<font style="color:rgb(0, 0, 0);">java.util.Date</font>`<font style="color:rgb(0, 0, 0);">、</font>`<font style="color:rgb(0, 0, 0);">java.time.LocalDate</font>`<font style="color:rgb(0, 0, 0);"> 或 </font>`<font style="color:rgb(0, 0, 0);">java.time.LocalDateTime</font>`<font style="color:rgb(0, 0, 0);"> 等日期类型的字段。</font>
|
||||||
- **用法**:用于 `java.util.Date`、`java.time.LocalDate` 或 `java.time.LocalDateTime` 等日期类型的字段。
|
+ <font style="color:rgb(0, 0, 0);">示例</font>
|
||||||
- 示例
|
|
||||||
|
|
||||||
```java
|
```java
|
||||||
@Future(message = "日期必须是未来的时间")
|
@Future(message = "日期必须是未来的时间")
|
||||||
private LocalDate eventDate;
|
private LocalDate eventDate;
|
||||||
```
|
```
|
||||||
|
|
||||||
### `@Past`
|
### `<font style="color:rgb(0, 0, 0);">@Past</font>`
|
||||||
|
+ **作用**<font style="color:rgb(0, 0, 0);">:验证日期字段的值是否为过去的日期。</font>
|
||||||
- **作用**:验证日期字段的值是否为过去的日期。
|
+ **用法**<font style="color:rgb(0, 0, 0);">:类似于 </font>`<font style="color:rgb(0, 0, 0);">@Future</font>`<font style="color:rgb(0, 0, 0);">,但是验证日期必须是过去的时间。</font>
|
||||||
- **用法**:类似于 `@Future`,但是验证日期必须是过去的时间。
|
+ <font style="color:rgb(0, 0, 0);">示例</font>
|
||||||
- 示例
|
|
||||||
|
|
||||||
```java
|
```java
|
||||||
@Past(message = "出生日期必须是过去的时间")
|
@Past(message = "出生日期必须是过去的时间")
|
||||||
private LocalDate birthDate;
|
private LocalDate birthDate;
|
||||||
```
|
```
|
||||||
|
|
||||||
### `@AssertTrue`
|
### `<font style="color:rgb(0, 0, 0);">@AssertTrue</font>`
|
||||||
|
+ **作用**<font style="color:rgb(0, 0, 0);">:验证字段值是否为 </font>`<font style="color:rgb(0, 0, 0);">true</font>`<font style="color:rgb(0, 0, 0);">。</font>
|
||||||
- **作用**:验证字段值是否为 `true`。
|
+ **用法**<font style="color:rgb(0, 0, 0);">:适用于布尔类型字段,如果值不是 </font>`<font style="color:rgb(0, 0, 0);">true</font>`<font style="color:rgb(0, 0, 0);">,则验证失败。</font>
|
||||||
- **用法**:适用于布尔类型字段,如果值不是 `true`,则验证失败。
|
+ <font style="color:rgb(0, 0, 0);">示例</font>
|
||||||
- 示例
|
|
||||||
|
|
||||||
```java
|
```java
|
||||||
@AssertTrue(message = "必须接受条款和条件")
|
@AssertTrue(message = "必须接受条款和条件")
|
||||||
private boolean acceptedTerms;
|
private boolean acceptedTerms;
|
||||||
```
|
```
|
||||||
|
|
||||||
### `@AssertFalse`
|
### `<font style="color:rgb(0, 0, 0);">@AssertFalse</font>`
|
||||||
|
+ **作用**<font style="color:rgb(0, 0, 0);">:验证字段值是否为 </font>`<font style="color:rgb(0, 0, 0);">false</font>`<font style="color:rgb(0, 0, 0);">。</font>
|
||||||
- **作用**:验证字段值是否为 `false`。
|
+ **用法**<font style="color:rgb(0, 0, 0);">:适用于布尔类型字段,如果值不是 </font>`<font style="color:rgb(0, 0, 0);">false</font>`<font style="color:rgb(0, 0, 0);">,则验证失败。</font>
|
||||||
- **用法**:适用于布尔类型字段,如果值不是 `false`,则验证失败。
|
+ <font style="color:rgb(0, 0, 0);">示例</font>
|
||||||
- 示例
|
|
||||||
|
|
||||||
```java
|
```java
|
||||||
@AssertFalse(message = "不能接受条款")
|
@AssertFalse(message = "不能接受条款")
|
||||||
private boolean declinedTerms;
|
private boolean declinedTerms;
|
||||||
```
|
```
|
||||||
|
|
||||||
### `@Valid` **和** `@Validated`
|
### `<font style="color:rgb(0, 0, 0);">@Valid</font>`** 和 **`<font style="color:rgb(0, 0, 0);">@Validated</font>`
|
||||||
|
+ **作用**<font style="color:rgb(0, 0, 0);">:触发嵌套对象的验证。</font>
|
||||||
- **作用**:触发嵌套对象的验证。
|
+ **用法**<font style="color:rgb(0, 0, 0);">:当你有嵌套对象(如表单中的对象属性是另一个对象),使用 </font>`<font style="color:rgb(0, 0, 0);">@Valid</font>`<font style="color:rgb(0, 0, 0);"> 或 </font>`<font style="color:rgb(0, 0, 0);">@Validated</font>`<font style="color:rgb(0, 0, 0);"> 注解来递归验证该对象。</font>
|
||||||
- **用法**:当你有嵌套对象(如表单中的对象属性是另一个对象),使用 `@Valid` 或 `@Validated` 注解来递归验证该对象。
|
+ <font style="color:rgb(0, 0, 0);">示例</font>
|
||||||
- 示例
|
|
||||||
|
|
||||||
```java
|
```java
|
||||||
@Valid
|
@Valid
|
||||||
private Address address;
|
private Address address;
|
||||||
```
|
```
|
||||||
|
|
||||||
### `@Digits(integer, fraction)`
|
### `<font style="color:rgb(0, 0, 0);">@Digits(integer, fraction)</font>`
|
||||||
|
+ **作用**<font style="color:rgb(0, 0, 0);">:验证数字字段的有效性,确保字段值是一个有效的数字,并且整数部分和小数部分的位数符合指定要求。</font>
|
||||||
- **作用**:验证数字字段的有效性,确保字段值是一个有效的数字,并且整数部分和小数部分的位数符合指定要求。
|
+ **用法**<font style="color:rgb(0, 0, 0);">:</font>`<font style="color:rgb(0, 0, 0);">integer</font>`<font style="color:rgb(0, 0, 0);"> 参数用于指定数字的整数部分的最大位数,</font>`<font style="color:rgb(0, 0, 0);">fraction</font>`<font style="color:rgb(0, 0, 0);"> 参数用于指定小数部分的最大位数。</font>
|
||||||
- **用法**:`integer` 参数用于指定数字的整数部分的最大位数,`fraction` 参数用于指定小数部分的最大位数。
|
+ <font style="color:rgb(0, 0, 0);">示例</font>
|
||||||
- 示例
|
|
||||||
|
|
||||||
```java
|
```java
|
||||||
@Digits(integer = 5, fraction = 2, message = "金额应为最大5位整数和2位小数")
|
@Digits(integer = 5, fraction = 2, message = "金额应为最大5位整数和2位小数")
|
||||||
private BigDecimal amount;
|
private BigDecimal amount;
|
||||||
```
|
```
|
||||||
|
|
||||||
- 这个例子验证金额字段的最大值为 `99999.99`(即最多5位整数和2位小数)。
|
- <font style="color:rgb(0, 0, 0);">这个例子验证金额字段的最大值为 </font>`<font style="color:rgb(0, 0, 0);">99999.99</font>`<font style="color:rgb(0, 0, 0);">(即最多5位整数和2位小数)。</font>
|
||||||
|
|
||||||
### `@CreditCardNumber`
|
### `<font style="color:rgb(0, 0, 0);">@CreditCardNumber</font>`
|
||||||
|
+ **作用**<font style="color:rgb(0, 0, 0);">:验证信用卡号的有效性,确保其符合信用卡的常见格式,通常包括 Luhn 算法的验证。</font>
|
||||||
- **作用**:验证信用卡号的有效性,确保其符合信用卡的常见格式,通常包括 Luhn 算法的验证。
|
+ **用法**<font style="color:rgb(0, 0, 0);">:该注解用于验证信用卡号的格式是否有效。</font>
|
||||||
- **用法**:该注解用于验证信用卡号的格式是否有效。
|
+ <font style="color:rgb(0, 0, 0);">示例</font>
|
||||||
- 示例
|
|
||||||
|
|
||||||
```java
|
```java
|
||||||
@CreditCardNumber(message = "请输入有效的信用卡号")
|
@CreditCardNumber(message = "请输入有效的信用卡号")
|
||||||
private String creditCardNumber;
|
private String creditCardNumber;
|
||||||
```
|
```
|
||||||
|
|
||||||
- 该注解会根据常见的信用卡规则(如 VISA、MasterCard 等)验证输入的信用卡号是否合法。
|
- <font style="color:rgb(0, 0, 0);">该注解会根据常见的信用卡规则(如 VISA、MasterCard 等)验证输入的信用卡号是否合法。</font>
|
||||||
|
|
||||||
### `@Range(min, max)`(不是 Spring 内置的,但通常来自 Hibernate Validator)
|
### `<font style="color:rgb(0, 0, 0);">@Range(min, max)</font>`<font style="color:rgb(0, 0, 0);">(不是 Spring 内置的,但通常来自 Hibernate Validator)</font>
|
||||||
|
+ **作用**<font style="color:rgb(0, 0, 0);">:验证字段值是否在指定的范围内。常用于 </font>`<font style="color:rgb(0, 0, 0);">Integer</font>`<font style="color:rgb(0, 0, 0);">、</font>`<font style="color:rgb(0, 0, 0);">Long</font>`<font style="color:rgb(0, 0, 0);">、</font>`<font style="color:rgb(0, 0, 0);">Double</font>`<font style="color:rgb(0, 0, 0);"> 等数值类型的字段。</font>
|
||||||
- **作用**:验证字段值是否在指定的范围内。常用于 `Integer`、`Long`、`Double` 等数值类型的字段。
|
+ **用法**<font style="color:rgb(0, 0, 0);">:指定字段的有效范围,当值不在范围内时会验证失败。</font>
|
||||||
- **用法**:指定字段的有效范围,当值不在范围内时会验证失败。
|
+ <font style="color:rgb(0, 0, 0);">示例</font>
|
||||||
- 示例
|
|
||||||
|
|
||||||
```java
|
```java
|
||||||
@Range(min = 1, max = 100, message = "数字必须在1到100之间")
|
@Range(min = 1, max = 100, message = "数字必须在1到100之间")
|
||||||
private int quantity;
|
private int quantity;
|
||||||
```
|
```
|
||||||
|
|
||||||
- 该注解会验证 `quantity` 字段的值是否在 `1` 到 `100` 之间。
|
- <font style="color:rgb(0, 0, 0);">该注解会验证 </font>`<font style="color:rgb(0, 0, 0);">quantity</font>`<font style="color:rgb(0, 0, 0);"> 字段的值是否在 </font>`<font style="color:rgb(0, 0, 0);">1</font>`<font style="color:rgb(0, 0, 0);"> 到 </font>`<font style="color:rgb(0, 0, 0);">100</font>`<font style="color:rgb(0, 0, 0);"> 之间。</font>
|
||||||
|
|
||||||
### `@URL`
|
### `<font style="color:rgb(0, 0, 0);">@URL</font>`
|
||||||
|
+ **作用**<font style="color:rgb(0, 0, 0);">:验证字段是否为有效的 URL 格式。</font>
|
||||||
- **作用**:验证字段是否为有效的 URL 格式。
|
+ **用法**<font style="color:rgb(0, 0, 0);">:用于字符串类型的字段,验证其是否符合有效的 URL 格式。</font>
|
||||||
- **用法**:用于字符串类型的字段,验证其是否符合有效的 URL 格式。
|
+ <font style="color:rgb(0, 0, 0);">示例</font>
|
||||||
- 示例
|
|
||||||
|
|
||||||
```java
|
```java
|
||||||
@URL(message = "请输入有效的网址")
|
@URL(message = "请输入有效的网址")
|
||||||
private String website;
|
private String website;
|
||||||
```
|
```
|
||||||
|
|
||||||
### `@Valid` **与** `@Validated`
|
### `<font style="color:rgb(0, 0, 0);">@Valid</font>`** 与 **`<font style="color:rgb(0, 0, 0);">@Validated</font>`
|
||||||
|
+ **作用**<font style="color:rgb(0, 0, 0);">:用于嵌套对象的验证,确保嵌套对象的字段也进行验证。</font>
|
||||||
- **作用**:用于嵌套对象的验证,确保嵌套对象的字段也进行验证。
|
+ **用法**<font style="color:rgb(0, 0, 0);">:这两个注解会触发嵌套对象的验证,通常用于嵌套的复杂表单数据结构。</font>
|
||||||
- **用法**:这两个注解会触发嵌套对象的验证,通常用于嵌套的复杂表单数据结构。
|
+ <font style="color:rgb(0, 0, 0);">示例</font>
|
||||||
- 示例
|
|
||||||
|
|
||||||
```java
|
```java
|
||||||
@Valid
|
@Valid
|
||||||
private Address address;
|
private Address address;
|
||||||
```
|
```
|
||||||
|
|
||||||
- 如果 `Address` 类中有字段使用了验证注解,`@Valid` 会递归地验证 `Address` 对象的所有字段。
|
- <font style="color:rgb(0, 0, 0);">如果 </font>`<font style="color:rgb(0, 0, 0);">Address</font>`<font style="color:rgb(0, 0, 0);"> 类中有字段使用了验证注解,</font>`<font style="color:rgb(0, 0, 0);">@Valid</font>`<font style="color:rgb(0, 0, 0);"> 会递归地验证 </font>`<font style="color:rgb(0, 0, 0);">Address</font>`<font style="color:rgb(0, 0, 0);"> 对象的所有字段。</font>
|
||||||
|
|
||||||
### `@FutureOrPresent`
|
### `<font style="color:rgb(0, 0, 0);">@FutureOrPresent</font>`
|
||||||
|
+ **作用**<font style="color:rgb(0, 0, 0);">:验证日期或时间字段的值是否是当前日期(包括今天)或未来的日期。</font>
|
||||||
- **作用**:验证日期或时间字段的值是否是当前日期(包括今天)或未来的日期。
|
+ **用法**<font style="color:rgb(0, 0, 0);">:该注解用于日期和时间字段,确保其为今天或将来的日期。</font>
|
||||||
- **用法**:该注解用于日期和时间字段,确保其为今天或将来的日期。
|
+ <font style="color:rgb(0, 0, 0);">示例</font><font style="color:rgb(0, 0, 0);">:</font>
|
||||||
- 示例:
|
|
||||||
|
|
||||||
```java
|
```java
|
||||||
@FutureOrPresent(message = "事件日期必须是今天或将来")
|
@FutureOrPresent(message = "事件日期必须是今天或将来")
|
||||||
private LocalDate eventDate;
|
private LocalDate eventDate;
|
||||||
```
|
```
|
||||||
|
|
||||||
### `@PastOrPresent`
|
### `<font style="color:rgb(0, 0, 0);">@PastOrPresent</font>`
|
||||||
|
+ **作用**<font style="color:rgb(0, 0, 0);">:验证日期或时间字段的值是否是当前日期(包括今天)或过去的日期。</font>
|
||||||
- **作用**:验证日期或时间字段的值是否是当前日期(包括今天)或过去的日期。
|
+ **用法**<font style="color:rgb(0, 0, 0);">:与 </font>`<font style="color:rgb(0, 0, 0);">@FutureOrPresent</font>`<font style="color:rgb(0, 0, 0);"> 相反,确保字段是过去或今天的日期。</font>
|
||||||
- **用法**:与 `@FutureOrPresent` 相反,确保字段是过去或今天的日期。
|
+ <font style="color:rgb(0, 0, 0);">示</font>
|
||||||
- 示
|
|
||||||
|
|
||||||
```java
|
```java
|
||||||
@PastOrPresent(message = "出生日期必须是过去的时间或今天")
|
@PastOrPresent(message = "出生日期必须是过去的时间或今天")
|
||||||
private LocalDate birthDate;
|
private LocalDate birthDate;
|
||||||
```
|
```
|
||||||
|
|
||||||
### `@Null`
|
### `<font style="color:rgb(0, 0, 0);">@Null</font>`
|
||||||
|
+ **作用**<font style="color:rgb(0, 0, 0);">:验证字段是否为 </font>`<font style="color:rgb(0, 0, 0);">null</font>`<font style="color:rgb(0, 0, 0);">。如果字段不为空,则验证失败。</font>
|
||||||
- **作用**:验证字段是否为 `null`。如果字段不为空,则验证失败。
|
+ **用法**<font style="color:rgb(0, 0, 0);">:该注解可以用于字段或方法参数上,确保字段值必须为 </font>`<font style="color:rgb(0, 0, 0);">null</font>`<font style="color:rgb(0, 0, 0);">。</font>
|
||||||
- **用法**:该注解可以用于字段或方法参数上,确保字段值必须为 `null`。
|
+ <font style="color:rgb(0, 0, 0);">示例</font>
|
||||||
- 示例
|
|
||||||
|
|
||||||
```java
|
```java
|
||||||
@Null(message = "该字段必须为null")
|
@Null(message = "该字段必须为null")
|
||||||
private String nickname;
|
private String nickname;
|
||||||
```
|
```
|
||||||
|
|
||||||
### `@ScriptAssert(lang, script)`
|
### `<font style="color:rgb(0, 0, 0);">@ScriptAssert(lang, script)</font>`
|
||||||
|
+ **作用**<font style="color:rgb(0, 0, 0);">:通过自定义脚本验证字段值。</font>
|
||||||
- **作用**:通过自定义脚本验证字段值。
|
+ **用法**<font style="color:rgb(0, 0, 0);">:允许使用自定义脚本(如 JavaScript)来执行复杂的验证逻辑。需要指定脚本语言和脚本内容。</font>
|
||||||
- **用法**:允许使用自定义脚本(如 JavaScript)来执行复杂的验证逻辑。需要指定脚本语言和脚本内容。
|
+ <font style="color:rgb(0, 0, 0);">示例</font>
|
||||||
- 示例
|
|
||||||
|
|
||||||
```java
|
```java
|
||||||
@ScriptAssert(lang = "javascript", script = "_this.password == _this.confirmPassword", message = "密码和确认密码必须一致")
|
@ScriptAssert(lang = "javascript", script = "_this.password == _this.confirmPassword", message = "密码和确认密码必须一致")
|
||||||
|
|
@ -254,15 +229,15 @@ private String password;
|
||||||
private String confirmPassword;
|
private String confirmPassword;
|
||||||
```
|
```
|
||||||
|
|
||||||
- 这个注解可以用于检查两个字段值是否一致。
|
- <font style="color:rgb(0, 0, 0);">这个注解可以用于检查两个字段值是否一致。</font>
|
||||||
|
|
||||||
### `@UniqueElements`(Hibernate Validator 扩展)
|
### `<font style="color:rgb(0, 0, 0);">@UniqueElements</font>`<font style="color:rgb(0, 0, 0);">(Hibernate Validator 扩展)</font>
|
||||||
|
+ **作用**<font style="color:rgb(0, 0, 0);">:确保集合中的元素是唯一的,常用于 List 或 Set 类型字段。</font>
|
||||||
- **作用**:确保集合中的元素是唯一的,常用于 List 或 Set 类型字段。
|
+ **用法**<font style="color:rgb(0, 0, 0);">:适用于集合类型字段,确保集合中的元素不重复。</font>
|
||||||
- **用法**:适用于集合类型字段,确保集合中的元素不重复。
|
+ <font style="color:rgb(0, 0, 0);">示例</font>
|
||||||
- 示例
|
|
||||||
|
|
||||||
```java
|
```java
|
||||||
@UniqueElements(message = "列表中的元素必须唯一")
|
@UniqueElements(message = "列表中的元素必须唯一")
|
||||||
private List<String> tags;
|
private List<String> tags;
|
||||||
```
|
```
|
||||||
|
|
||||||
|
|
|
||||||
|
|
@ -1,30 +1,11 @@
|
||||||
---
|
## <font style="color:rgb(0, 0, 0);">SpringSecurity</font>
|
||||||
title: SpringSecurity笔记
|
|
||||||
index: true
|
|
||||||
icon: devicon:spring
|
|
||||||
category:
|
|
||||||
- 笔记
|
|
||||||
- 记录
|
|
||||||
- 学习
|
|
||||||
- Java
|
|
||||||
- Spring
|
|
||||||
headerDepth: 4
|
|
||||||
dir:
|
|
||||||
order: 3
|
|
||||||
---
|
|
||||||
|
|
||||||
|
|
||||||
## SpringSecurity笔记
|
|
||||||
|
|
||||||
### 密码转换器(Password Encoder)
|
### 密码转换器(Password Encoder)
|
||||||
|
|
||||||
Spring Security 提供了多种密码转换器(Password Encoder),这些转换器用于对用户密码进行加密和验证。常见的密码转换器包括:
|
Spring Security 提供了多种密码转换器(Password Encoder),这些转换器用于对用户密码进行加密和验证。常见的密码转换器包括:
|
||||||
|
|
||||||
1. **BCryptPasswordEncoder**:
|
1. **BCryptPasswordEncoder**:
|
||||||
|
- 使用 **BCrypt** 算法对密码进行加密。
|
||||||
- 使用 **BCrypt** 算法对密码进行加密。
|
- 是最常用的密码加密方案,具有强大的加密性,并且支持自动加盐(salt),防止暴力破解攻击。
|
||||||
- 是最常用的密码加密方案,具有强大的加密性,并且支持自动加盐(salt),防止暴力破解攻击。
|
- 示例:
|
||||||
- 示例:
|
|
||||||
|
|
||||||
```java
|
```java
|
||||||
@Bean
|
@Bean
|
||||||
|
|
@ -33,11 +14,10 @@ public PasswordEncoder passwordEncoder() {
|
||||||
}
|
}
|
||||||
```
|
```
|
||||||
|
|
||||||
1. **NoOpPasswordEncoder**:
|
2. **NoOpPasswordEncoder**:
|
||||||
|
- 不对密码进行加密,直接返回明文密码。
|
||||||
- 不对密码进行加密,直接返回明文密码。
|
- 主要用于开发和测试环境,**不推荐在生产环境中使用**。
|
||||||
- 主要用于开发和测试环境,**不推荐在生产环境中使用**。
|
- 示例:
|
||||||
- 示例:
|
|
||||||
|
|
||||||
```java
|
```java
|
||||||
@Bean
|
@Bean
|
||||||
|
|
@ -46,11 +26,10 @@ public PasswordEncoder passwordEncoder() {
|
||||||
}
|
}
|
||||||
```
|
```
|
||||||
|
|
||||||
1. **Pbkdf2PasswordEncoder**:
|
3. **Pbkdf2PasswordEncoder**:
|
||||||
|
- 使用 **PBKDF2** 算法进行密码加密。
|
||||||
- 使用 **PBKDF2** 算法进行密码加密。
|
- 提供较强的安全性,并且支持对密码进行哈希。
|
||||||
- 提供较强的安全性,并且支持对密码进行哈希。
|
- 示例:
|
||||||
- 示例:
|
|
||||||
|
|
||||||
```java
|
```java
|
||||||
@Bean
|
@Bean
|
||||||
|
|
@ -59,11 +38,10 @@ public PasswordEncoder passwordEncoder() {
|
||||||
}
|
}
|
||||||
```
|
```
|
||||||
|
|
||||||
1. **Argon2PasswordEncoder**:
|
4. **Argon2PasswordEncoder**:
|
||||||
|
- 使用 **Argon2** 算法对密码进行加密。
|
||||||
- 使用 **Argon2** 算法对密码进行加密。
|
- Argon2 是目前被认为最强的密码哈希算法,支持内存密集型计算,从而防止硬件加速破解。
|
||||||
- Argon2 是目前被认为最强的密码哈希算法,支持内存密集型计算,从而防止硬件加速破解。
|
- 示例:
|
||||||
- 示例:
|
|
||||||
|
|
||||||
```java
|
```java
|
||||||
@Bean
|
@Bean
|
||||||
|
|
@ -72,11 +50,10 @@ public PasswordEncoder passwordEncoder() {
|
||||||
}
|
}
|
||||||
```
|
```
|
||||||
|
|
||||||
1. **SCryptPasswordEncoder**:
|
5. **SCryptPasswordEncoder**:
|
||||||
|
- 使用 **SCrypt** 算法进行密码加密。
|
||||||
- 使用 **SCrypt** 算法进行密码加密。
|
- SCrypt 是另一种内存密集型的密码加密算法,与 Argon2 类似,旨在防止硬件加速破解。
|
||||||
- SCrypt 是另一种内存密集型的密码加密算法,与 Argon2 类似,旨在防止硬件加速破解。
|
- 示例:
|
||||||
- 示例:
|
|
||||||
|
|
||||||
```java
|
```java
|
||||||
@Bean
|
@Bean
|
||||||
|
|
@ -85,19 +62,18 @@ public PasswordEncoder passwordEncoder() {
|
||||||
}
|
}
|
||||||
```
|
```
|
||||||
|
|
||||||
1. **MessageDigestPasswordEncoder** (已废弃):
|
6. **MessageDigestPasswordEncoder** (已废弃):
|
||||||
|
- 基于 **MessageDigest** 算法进行加密(如 SHA-1、SHA-256 等)。
|
||||||
|
- 由于缺乏盐和密钥加密机制,已被其他更强的加密方式所替代。
|
||||||
|
|
||||||
- 基于 **MessageDigest** 算法进行加密(如 SHA-1、SHA-256 等)。
|
> 选择密码转换器的建议:
|
||||||
- 由于缺乏盐和密钥加密机制,已被其他更强的加密方式所替代。
|
>
|
||||||
|
> + 在现代应用中,推荐使用 **BCryptPasswordEncoder** 或 **Argon2PasswordEncoder**,这两种算法提供了强大的加密性。
|
||||||
选择密码转换器的建议:
|
> + **Pbkdf2PasswordEncoder** 和 **SCryptPasswordEncoder** 也可以作为备选方案,尤其是当你希望加密算法能够承受更多资源密集型攻击时。
|
||||||
|
> + **NoOpPasswordEncoder** 仅限于开发和测试环境。
|
||||||
- 在现代应用中,推荐使用 **BCryptPasswordEncoder** 或 **Argon2PasswordEncoder**,这两种算法提供了强大的加密性。
|
>
|
||||||
- **Pbkdf2PasswordEncoder** 和 **SCryptPasswordEncoder** 也可以作为备选方案,尤其是当你希望加密算法能够承受更多资源密集型攻击时。
|
|
||||||
- **NoOpPasswordEncoder** 仅限于开发和测试环境。
|
|
||||||
|
|
||||||
### 访问主页
|
### 访问主页
|
||||||
|
|
||||||
需要使用`http://localhost:8080/index`来访问主页,可以在配置中配置,访问根路径直接跳转
|
需要使用`http://localhost:8080/index`来访问主页,可以在配置中配置,访问根路径直接跳转
|
||||||
|
|
||||||
```java
|
```java
|
||||||
|
|
@ -146,7 +122,6 @@ public class WebConfiguration implements WebMvcConfigurer {
|
||||||
```
|
```
|
||||||
|
|
||||||
### 自定义登录
|
### 自定义登录
|
||||||
|
|
||||||
```java
|
```java
|
||||||
package cn.bunny.springdemo.configuration;
|
package cn.bunny.springdemo.configuration;
|
||||||
|
|
||||||
|
|
@ -227,13 +202,13 @@ public class SecurityConfiguration {
|
||||||
```
|
```
|
||||||
|
|
||||||
### CSRF 伪造
|
### CSRF 伪造
|
||||||
|
|
||||||
通常在自定义登录页面中加入
|
通常在自定义登录页面中加入
|
||||||
|
|
||||||
```html
|
```html
|
||||||
<label>
|
<label>
|
||||||
<input name="_csrf" placeholder="_csrf" th:value="${_csrf.token}" type="hidden"/>
|
<input name="_csrf" placeholder="_csrf" th:value="${_csrf.token}" type="hidden"/>
|
||||||
</label>
|
</label>
|
||||||
|
|
||||||
```
|
```
|
||||||
|
|
||||||
如果需要禁用
|
如果需要禁用
|
||||||
|
|
@ -243,7 +218,6 @@ public class SecurityConfiguration {
|
||||||
```
|
```
|
||||||
|
|
||||||
### 开发授权服务器
|
### 开发授权服务器
|
||||||
|
|
||||||
```xml
|
```xml
|
||||||
<!--资源服务器-->
|
<!--资源服务器-->
|
||||||
<dependency>
|
<dependency>
|
||||||
|
|
@ -260,4 +234,6 @@ public class SecurityConfiguration {
|
||||||
<groupId>org.springframework.boot</groupId>
|
<groupId>org.springframework.boot</groupId>
|
||||||
<artifactId>spring-boot-starter-oauth2-authorization-server</artifactId>
|
<artifactId>spring-boot-starter-oauth2-authorization-server</artifactId>
|
||||||
</dependency>
|
</dependency>
|
||||||
|
|
||||||
```
|
```
|
||||||
|
|
||||||
|
|
@ -1,9 +1,4 @@
|
||||||
---
|
# Spring Security快速入门
|
||||||
dir:
|
|
||||||
order: 2
|
|
||||||
---
|
|
||||||
|
|
||||||
# 之前SpringSecurity
|
|
||||||
**官方文档:**[https://docs.spring.io/spring-security/reference/index.html](https://docs.spring.io/spring-security/reference/index.html)
|
**官方文档:**[https://docs.spring.io/spring-security/reference/index.html](https://docs.spring.io/spring-security/reference/index.html)
|
||||||
|
|
||||||
**功能:**
|
**功能:**
|
||||||
|
|
@ -30,7 +25,7 @@ dir:
|
||||||
|
|
||||||
项目结构
|
项目结构
|
||||||
|
|
||||||

|
|
||||||
|
|
||||||
#### 基本包
|
#### 基本包
|
||||||
这里用到了数据库但是在项目刚开始启动时,是没有配置数据库的,这时候启动肯定会报错,所以我们现在启动类上排出连接数据库的类。
|
这里用到了数据库但是在项目刚开始启动时,是没有配置数据库的,这时候启动肯定会报错,所以我们现在启动类上排出连接数据库的类。
|
||||||
|
|
@ -170,7 +165,7 @@ HTML模板
|
||||||
|
|
||||||
比如点击下面按钮会自动匹配路径并退出。
|
比如点击下面按钮会自动匹配路径并退出。
|
||||||
|
|
||||||

|
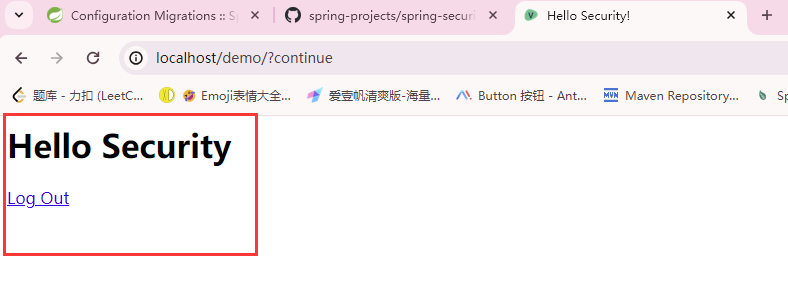
|
||||||
|
|
||||||
## 自定义Security配置
|
## 自定义Security配置
|
||||||
SecurityProperties修改默认用户和密码。
|
SecurityProperties修改默认用户和密码。
|
||||||
|
|
@ -566,7 +561,7 @@ public class PasswordTest {
|
||||||
|
|
||||||
## 自定义登录页面
|
## 自定义登录页面
|
||||||
### 创建登录页
|
### 创建登录页
|
||||||

|
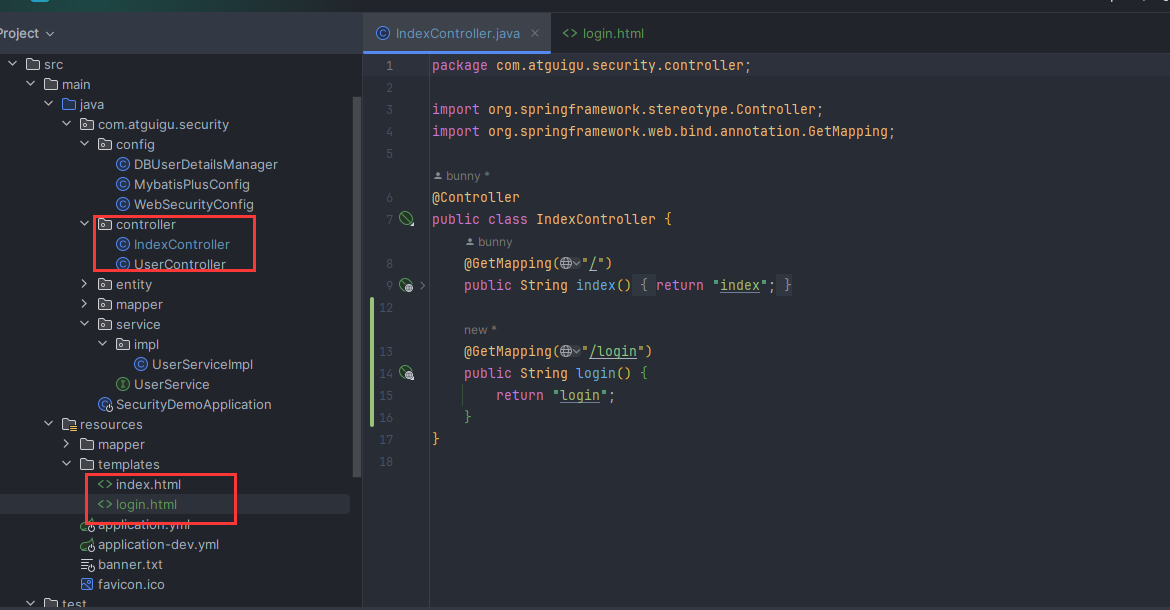
|
||||||
|
|
||||||
#### 第一步:创建Controller
|
#### 第一步:创建Controller
|
||||||
```java
|
```java
|
||||||
|
|
@ -656,7 +651,7 @@ public class WebSecurityConfig {
|
||||||
}
|
}
|
||||||
```
|
```
|
||||||
|
|
||||||

|
|
||||||
|
|
||||||
### 登录页的细节
|
### 登录页的细节
|
||||||
在`WebSecurityConfig`中自定义前端传递值,默认传递用户名和密码为`username`和`password`,在下面示例中可以修改为自定义的用户名和密码参数。
|
在`WebSecurityConfig`中自定义前端传递值,默认传递用户名和密码为`username`和`password`,在下面示例中可以修改为自定义的用户名和密码参数。
|
||||||
|
|
@ -725,7 +720,7 @@ public class MyAuthenticationSuccessHandler implements AuthenticationSuccessHand
|
||||||
}
|
}
|
||||||
```
|
```
|
||||||
|
|
||||||

|
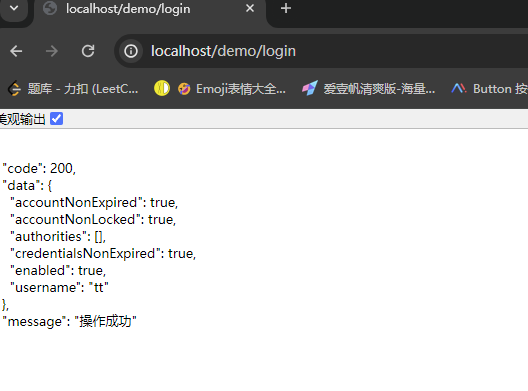
|
||||||
|
|
||||||
在`WebSecurityConfig`类中添加以下`.successHandler(new MyAuthenticationSuccessHandler());`表示成功的返回结果,自定义结果。
|
在`WebSecurityConfig`类中添加以下`.successHandler(new MyAuthenticationSuccessHandler());`表示成功的返回结果,自定义结果。
|
||||||
|
|
||||||
|
|
@ -789,7 +784,7 @@ httpSecurity.formLogin(form -> {
|
||||||
});
|
});
|
||||||
```
|
```
|
||||||
|
|
||||||

|

|
||||||
|
|
||||||
### 注销响应
|
### 注销响应
|
||||||
和前面成功和失败过程相似,只需要在`from`中再添加即可。
|
和前面成功和失败过程相似,只需要在`from`中再添加即可。
|
||||||
|
|
@ -830,7 +825,7 @@ httpSecurity.logout(logout -> {
|
||||||
});
|
});
|
||||||
```
|
```
|
||||||
|
|
||||||

|
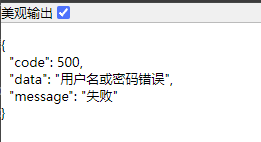
|
||||||
|
|
||||||
之后访问:[http://localhost/demo](http://localhost/demo)
|
之后访问:[http://localhost/demo](http://localhost/demo)
|
||||||
|
|
||||||
|
|
@ -881,13 +876,13 @@ httpSecurity.exceptionHandling(exception -> {
|
||||||
|
|
||||||
访问:[http://localhost/demo/](http://localhost/demo/)
|
访问:[http://localhost/demo/](http://localhost/demo/)
|
||||||
|
|
||||||

|
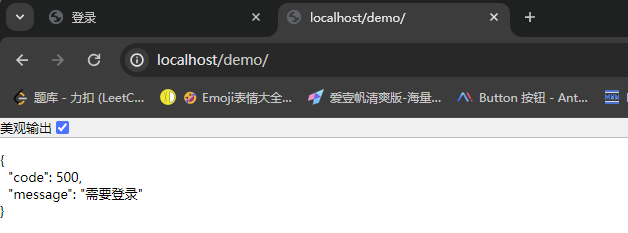
|
||||||
|
|
||||||
登录后
|
登录后
|
||||||
|
|
||||||

|
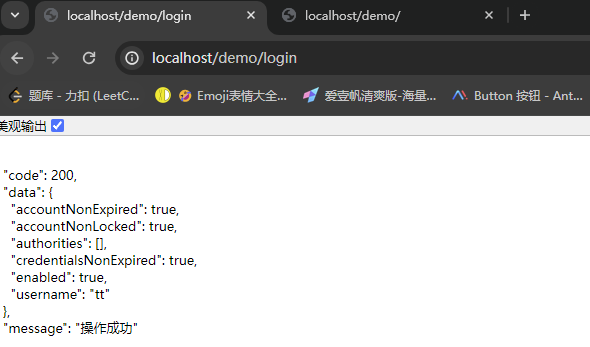
|
||||||
|
|
||||||

|
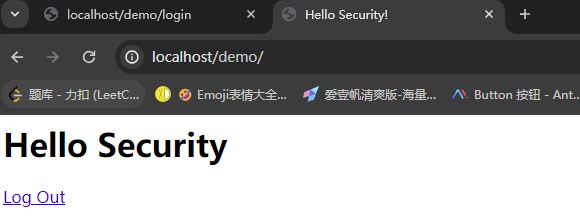
|
||||||
|
|
||||||
### 跨域访问
|
### 跨域访问
|
||||||
在`WebSecurityConfig`类中添加以下。
|
在`WebSecurityConfig`类中添加以下。
|
||||||
|
|
@ -1163,11 +1158,11 @@ public UserDetails loadUserByUsername(String username) throws UsernameNotFoundEx
|
||||||
|
|
||||||
为`roles("ADMIN")`时全部可以访问。
|
为`roles("ADMIN")`时全部可以访问。
|
||||||
|
|
||||||

|
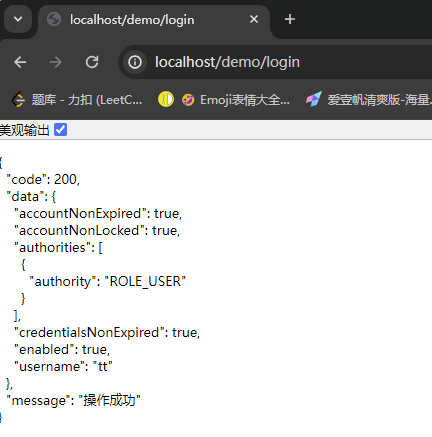
|
||||||
|
|
||||||
为普通用户时。
|
为普通用户时。
|
||||||
|
|
||||||

|
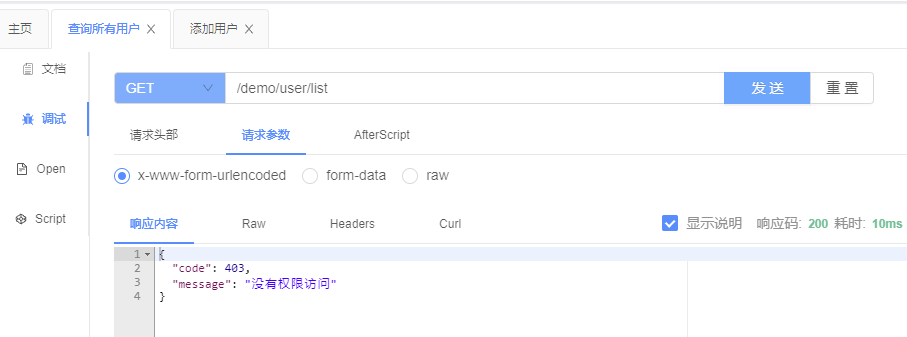
|
||||||
|
|
||||||
|
|
||||||
|
|
||||||
|
|
@ -1349,5 +1344,5 @@ public class UserController {
|
||||||
> 如果当前用户不是admin用户访问不了。
|
> 如果当前用户不是admin用户访问不了。
|
||||||
>
|
>
|
||||||
|
|
||||||

|
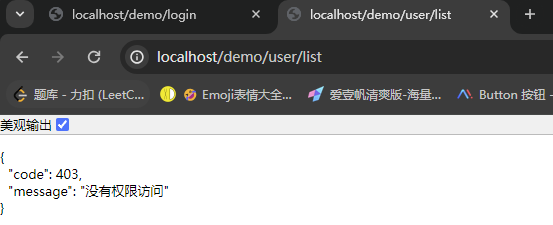
|
||||||
|
|
||||||
|
|
@ -1,8 +1,3 @@
|
||||||
---
|
|
||||||
dir:
|
|
||||||
order: 1
|
|
||||||
---
|
|
||||||
|
|
||||||
# 权限管理设计基础数据字典
|
# 权限管理设计基础数据字典
|
||||||
https://www.cnblogs.com/myindex/p/9116177.html
|
https://www.cnblogs.com/myindex/p/9116177.html
|
||||||
|
|
||||||
|
|
@ -160,3 +155,4 @@ https://www.cnblogs.com/myindex/p/9116177.html
|
||||||
|
|
||||||
|
|
||||||
|
|
||||||
|
|
||||||
|
Before Width: | Height: | Size: 9.5 KiB |
|
|
@ -1,22 +1,16 @@
|
||||||
# 向application域共享数据
|
## <font style="color:rgb(0, 0, 0);">向application域共享数据</font>
|
||||||
|
|
||||||
## 向application域共享数据
|
|
||||||
|
|
||||||
在 Spring MVC 中,`Application` 域(也称为 **ServletContext**)是一个全局范围,用于在整个应用程序中共享数据。不同于 **Session** 域和 **Request** 域,`Application` 域中的数据对整个 Web 应用的所有用户都是可见的,因此适合存储全局共享的配置信息、常量、初始化数据等。
|
在 Spring MVC 中,`Application` 域(也称为 **ServletContext**)是一个全局范围,用于在整个应用程序中共享数据。不同于 **Session** 域和 **Request** 域,`Application` 域中的数据对整个 Web 应用的所有用户都是可见的,因此适合存储全局共享的配置信息、常量、初始化数据等。
|
||||||
|
|
||||||
在 Spring MVC 中,我们可以通过 `ServletContext` 来向 **Application** 域共享数据,通常使用 `setAttribute` 和 `getAttribute` 方法来进行操作。
|
在 Spring MVC 中,我们可以通过 `ServletContext` 来向 **Application** 域共享数据,通常使用 `setAttribute` 和 `getAttribute` 方法来进行操作。
|
||||||
|
|
||||||
### 1. **通过** `ServletContext` **共享数据**
|
### 1. **通过 **`ServletContext`** 共享数据**
|
||||||
|
|
||||||
`ServletContext` 是与整个 Web 应用程序相关联的对象,它允许你在多个请求和多个会话之间共享数据。在 Spring MVC 中,可以通过以下两种方式来访问 `ServletContext`:
|
`ServletContext` 是与整个 Web 应用程序相关联的对象,它允许你在多个请求和多个会话之间共享数据。在 Spring MVC 中,可以通过以下两种方式来访问 `ServletContext`:
|
||||||
|
|
||||||
- 直接使用 `HttpServletRequest.getSession().getServletContext()` 获取 `ServletContext`。
|
+ 直接使用 `HttpServletRequest.getSession().getServletContext()` 获取 `ServletContext`。
|
||||||
- 使用 `@Autowired` 注解注入 `ServletContext` 对象。
|
+ 使用 `@Autowired` 注解注入 `ServletContext` 对象。
|
||||||
|
|
||||||
#### 示例 1:通过 `ServletContext` 共享数据
|
#### 示例 1:通过 `ServletContext` 共享数据
|
||||||
|
|
||||||
##### 1.1 通过 `HttpServletRequest` 获取 `ServletContext`
|
##### 1.1 通过 `HttpServletRequest` 获取 `ServletContext`
|
||||||
|
|
||||||
```java
|
```java
|
||||||
@Controller
|
@Controller
|
||||||
public class ApplicationController {
|
public class ApplicationController {
|
||||||
|
|
@ -48,11 +42,10 @@ public class ApplicationController {
|
||||||
|
|
||||||
**URL 请求:**
|
**URL 请求:**
|
||||||
|
|
||||||
- `GET /setApplicationData` 会向 `Application` 域中存储 `"appName": "SpringMVCApp"` 和 `"version": "1.0.0"`。
|
+ `GET /setApplicationData` 会向 `Application` 域中存储 `"appName": "SpringMVCApp"` 和 `"version": "1.0.0"`。
|
||||||
- `GET /getApplicationData` 会从 `Application` 域中读取数据,并返回给视图。
|
+ `GET /getApplicationData` 会从 `Application` 域中读取数据,并返回给视图。
|
||||||
|
|
||||||
##### 1.2 通过 `@Autowired` 注入 `ServletContext`
|
##### 1.2 通过 `@Autowired` 注入 `ServletContext`
|
||||||
|
|
||||||
```java
|
```java
|
||||||
@Controller
|
@Controller
|
||||||
public class ApplicationController {
|
public class ApplicationController {
|
||||||
|
|
@ -84,25 +77,21 @@ public class ApplicationController {
|
||||||
在这个例子中,`@Autowired` 注解会自动将 `ServletContext` 注入到控制器中。
|
在这个例子中,`@Autowired` 注解会自动将 `ServletContext` 注入到控制器中。
|
||||||
|
|
||||||
### 2. **应用场景**
|
### 2. **应用场景**
|
||||||
|
|
||||||
将数据放到 `Application` 域中通常用于存储以下类型的数据:
|
将数据放到 `Application` 域中通常用于存储以下类型的数据:
|
||||||
|
|
||||||
- **应用级别的数据**:例如应用名称、版本号、初始化配置等,这些数据是全局共享的。
|
+ **应用级别的数据**:例如应用名称、版本号、初始化配置等,这些数据是全局共享的。
|
||||||
- **常量和初始化信息**:如果有一些需要在多个请求中共享的常量或初始化信息,可以将它们放到 `Application` 域中。
|
+ **常量和初始化信息**:如果有一些需要在多个请求中共享的常量或初始化信息,可以将它们放到 `Application` 域中。
|
||||||
- **数据库连接池或常用资源**:对于一些全局共享的资源(如数据库连接池),可以在 `Application` 域中进行配置并在不同的请求中共享。
|
+ **数据库连接池或常用资源**:对于一些全局共享的资源(如数据库连接池),可以在 `Application` 域中进行配置并在不同的请求中共享。
|
||||||
|
|
||||||
### 3. **注意事项**
|
### 3. **注意事项**
|
||||||
|
+ **全局共享**:与 `Session` 和 `Request` 域不同,`Application` 域中的数据对所有用户和请求都可见。因此,要特别小心在 `Application` 域中存储敏感数据,避免泄漏用户个人信息等。
|
||||||
- **全局共享**:与 `Session` 和 `Request` 域不同,`Application` 域中的数据对所有用户和请求都可见。因此,要特别小心在 `Application` 域中存储敏感数据,避免泄漏用户个人信息等。
|
+ **生命周期**:`Application` 域中的数据在整个应用程序生命周期内有效,直到应用服务器重新启动。因此,放入 `Application` 域的数据一般是全局的、不会频繁变化的。
|
||||||
- **生命周期**:`Application` 域中的数据在整个应用程序生命周期内有效,直到应用服务器重新启动。因此,放入 `Application` 域的数据一般是全局的、不会频繁变化的。
|
+ **线程安全**:`Application` 域的数据是共享的,因此在并发访问时要考虑线程安全问题。如果有多个线程访问同一数据,可能需要进行同步。
|
||||||
- **线程安全**:`Application` 域的数据是共享的,因此在并发访问时要考虑线程安全问题。如果有多个线程访问同一数据,可能需要进行同步。
|
|
||||||
|
|
||||||
### 4. **清理 Application 域中的数据**
|
### 4. **清理 Application 域中的数据**
|
||||||
|
|
||||||
如果不再需要某个共享数据,可以使用 `removeAttribute` 方法从 `Application` 域中移除该数据。
|
如果不再需要某个共享数据,可以使用 `removeAttribute` 方法从 `Application` 域中移除该数据。
|
||||||
|
|
||||||
#### 示例:删除 `Application` 域中的数据
|
#### 示例:删除 `Application` 域中的数据
|
||||||
|
|
||||||
```java
|
```java
|
||||||
@Controller
|
@Controller
|
||||||
public class ApplicationController {
|
public class ApplicationController {
|
||||||
|
|
@ -121,14 +110,12 @@ public class ApplicationController {
|
||||||
|
|
||||||
**URL 请求:**
|
**URL 请求:**
|
||||||
|
|
||||||
- `GET /removeApplicationData` 会从 `Application` 域中移除 `appName` 和 `version` 属性。
|
+ `GET /removeApplicationData` 会从 `Application` 域中移除 `appName` 和 `version` 属性。
|
||||||
|
|
||||||
### 5. **使用** `@ApplicationScope`**(Spring 方式)**
|
|
||||||
|
|
||||||
|
### 5. **使用 **`@ApplicationScope`**(Spring 方式)**
|
||||||
如果使用 Spring 框架进行开发,也可以使用 Spring 提供的 `@ApplicationScope` 注解来定义在整个应用范围内共享的 Bean。这种方法通常用于 Spring 组件,而不是直接操作 `ServletContext`。
|
如果使用 Spring 框架进行开发,也可以使用 Spring 提供的 `@ApplicationScope` 注解来定义在整个应用范围内共享的 Bean。这种方法通常用于 Spring 组件,而不是直接操作 `ServletContext`。
|
||||||
|
|
||||||
#### 示例:使用 `@ApplicationScope`
|
#### 示例:使用 `@ApplicationScope`
|
||||||
|
|
||||||
```java
|
```java
|
||||||
@Component
|
@Component
|
||||||
@Scope("application")
|
@Scope("application")
|
||||||
|
|
@ -143,7 +130,10 @@ public class AppConfig {
|
||||||
|
|
||||||
在这种情况下,Spring 管理的 Bean 会在应用级别共享,类似于 `ServletContext` 中存储的数据。
|
在这种情况下,Spring 管理的 Bean 会在应用级别共享,类似于 `ServletContext` 中存储的数据。
|
||||||
|
|
||||||
- `Application` 域(即 `ServletContext`)用于在整个应用程序范围内共享数据,适合存储全局共享的信息、配置和常量。
|
> + `Application` 域(即 `ServletContext`)用于在整个应用程序范围内共享数据,适合存储全局共享的信息、配置和常量。
|
||||||
- 通过 `HttpServletRequest.getServletContext()` 或 `@Autowired` 注解可以访问 `ServletContext` 并向 `Application` 域中共享数据。
|
> + 通过 `HttpServletRequest.getServletContext()` 或 `@Autowired` 注解可以访问 `ServletContext` 并向 `Application` 域中共享数据。
|
||||||
- 数据存储在 `Application` 域中可以在整个应用程序生命周期内有效,适用于共享全局性的、无需频繁更新的数据。
|
> + 数据存储在 `Application` 域中可以在整个应用程序生命周期内有效,适用于共享全局性的、无需频繁更新的数据。
|
||||||
- 应谨慎存储敏感数据,并注意线程安全和数据的生命周期。
|
> + 应谨慎存储敏感数据,并注意线程安全和数据的生命周期。
|
||||||
|
>
|
||||||
|
|
||||||
|
##
|
||||||
|
|
|
||||||
|
|
@ -1,17 +1,12 @@
|
||||||
# Session共享数据
|
## <font style="color:rgb(0, 0, 0);">向session共享数据</font>
|
||||||
|
|
||||||
## 向session共享数据
|
|
||||||
|
|
||||||
在 Spring MVC 中,**Session** 是用于存储用户会话期间的数据的一种机制。每个用户访问的应用程序都将拥有一个唯一的会话。通过 `HttpSession`,可以在用户的会话中存储一些数据,直到用户关闭浏览器或会话过期。
|
在 Spring MVC 中,**Session** 是用于存储用户会话期间的数据的一种机制。每个用户访问的应用程序都将拥有一个唯一的会话。通过 `HttpSession`,可以在用户的会话中存储一些数据,直到用户关闭浏览器或会话过期。
|
||||||
|
|
||||||
Spring MVC 提供了多种方式来与 `HttpSession` 进行交互,下面详细介绍如何通过 `HttpSession` 向 Session 共享数据。
|
<font style="color:rgb(0, 0, 0);">Spring MVC 提供了多种方式来与 </font>`<font style="color:rgb(0, 0, 0);">HttpSession</font>`<font style="color:rgb(0, 0, 0);"> 进行交互,下面详细介绍如何通过 </font>`<font style="color:rgb(0, 0, 0);">HttpSession</font>`<font style="color:rgb(0, 0, 0);"> 向 Session 共享数据。</font>
|
||||||
|
|
||||||
### 1. **通过** `HttpSession` **操作 Session 数据**
|
### <font style="color:rgb(0, 0, 0);">1. </font>**通过 **`<font style="color:rgb(0, 0, 0);">HttpSession</font>`** 操作 Session 数据**
|
||||||
|
<font style="color:rgb(0, 0, 0);">在 Spring MVC 控制器中,您可以通过 </font>`<font style="color:rgb(0, 0, 0);">HttpSession</font>`<font style="color:rgb(0, 0, 0);"> 对象来存储和读取会话数据。</font>
|
||||||
在 Spring MVC 控制器中,您可以通过 `HttpSession` 对象来存储和读取会话数据。
|
|
||||||
|
|
||||||
#### 示例:将数据添加到 Session
|
|
||||||
|
|
||||||
|
#### <font style="color:rgb(0, 0, 0);">示例:将数据添加到 Session</font>
|
||||||
```java
|
```java
|
||||||
@Controller
|
@Controller
|
||||||
public class SessionController {
|
public class SessionController {
|
||||||
|
|
@ -38,15 +33,13 @@ public class SessionController {
|
||||||
|
|
||||||
**URL 请求:**
|
**URL 请求:**
|
||||||
|
|
||||||
- `GET /setSessionData` 会将数据 `"username": "JohnDoe"` 和 `"age": 30` 存储到 Session 中。
|
+ `<font style="color:rgb(0, 0, 0);">GET /setSessionData</font>`<font style="color:rgb(0, 0, 0);"> 会将数据 </font>`<font style="color:rgb(0, 0, 0);">"username": "JohnDoe"</font>`<font style="color:rgb(0, 0, 0);"> 和 </font>`<font style="color:rgb(0, 0, 0);">"age": 30</font>`<font style="color:rgb(0, 0, 0);"> 存储到 Session 中。</font>
|
||||||
- `GET /getSessionData` 会从 Session 中获取并显示存储的值。
|
+ `<font style="color:rgb(0, 0, 0);">GET /getSessionData</font>`<font style="color:rgb(0, 0, 0);"> 会从 Session 中获取并显示存储的值。</font>
|
||||||
|
|
||||||
### 2. **使用** `@SessionAttributes` **注解**
|
### <font style="color:rgb(0, 0, 0);">2. </font>**使用 **`<font style="color:rgb(0, 0, 0);">@SessionAttributes</font>`** 注解**
|
||||||
|
`<font style="color:rgb(0, 0, 0);">@SessionAttributes</font>`<font style="color:rgb(0, 0, 0);"> 注解用于将控制器中的某些模型属性放入 Session 中。这种方式比直接操作 </font>`<font style="color:rgb(0, 0, 0);">HttpSession</font>`<font style="color:rgb(0, 0, 0);"> 更为方便和简洁,特别是当需要共享多个模型属性时。</font>
|
||||||
`@SessionAttributes` 注解用于将控制器中的某些模型属性放入 Session 中。这种方式比直接操作 `HttpSession` 更为方便和简洁,特别是当需要共享多个模型属性时。
|
|
||||||
|
|
||||||
#### 示例:使用 `@SessionAttributes`
|
|
||||||
|
|
||||||
|
#### <font style="color:rgb(0, 0, 0);">示例:使用 </font>`<font style="color:rgb(0, 0, 0);">@SessionAttributes</font>`
|
||||||
```java
|
```java
|
||||||
@Controller
|
@Controller
|
||||||
@SessionAttributes("user")
|
@SessionAttributes("user")
|
||||||
|
|
@ -71,17 +64,15 @@ public class UserController {
|
||||||
|
|
||||||
**URL 请求:**
|
**URL 请求:**
|
||||||
|
|
||||||
- `GET /setUser` 会将 `user` 对象放入 Session 中。
|
+ `<font style="color:rgb(0, 0, 0);">GET /setUser</font>`<font style="color:rgb(0, 0, 0);"> 会将 </font>`<font style="color:rgb(0, 0, 0);">user</font>`<font style="color:rgb(0, 0, 0);"> 对象放入 Session 中。</font>
|
||||||
- `GET /getUser` 会从 Session 中获取 `user` 对象。
|
+ `<font style="color:rgb(0, 0, 0);">GET /getUser</font>`<font style="color:rgb(0, 0, 0);"> 会从 Session 中获取 </font>`<font style="color:rgb(0, 0, 0);">user</font>`<font style="color:rgb(0, 0, 0);"> 对象。</font>
|
||||||
|
|
||||||
`@SessionAttributes` 注解不仅可以放入 Session 中,还可以与 `@ModelAttribute` 注解结合使用,确保模型数据保持在 Session 中。
|
`<font style="color:rgb(0, 0, 0);">@SessionAttributes</font>`<font style="color:rgb(0, 0, 0);"> 注解不仅可以放入 Session 中,还可以与 </font>`<font style="color:rgb(0, 0, 0);">@ModelAttribute</font>`<font style="color:rgb(0, 0, 0);"> 注解结合使用,确保模型数据保持在 Session 中。</font>
|
||||||
|
|
||||||
### 3. **使用** `@ModelAttribute` **注解**
|
### <font style="color:rgb(0, 0, 0);">3. </font>**使用 **`<font style="color:rgb(0, 0, 0);">@ModelAttribute</font>`** 注解**
|
||||||
|
`<font style="color:rgb(0, 0, 0);">@ModelAttribute</font>`<font style="color:rgb(0, 0, 0);"> 注解允许将数据放入模型中,并且在方法调用前通过 </font>`<font style="color:rgb(0, 0, 0);">Model</font>`<font style="color:rgb(0, 0, 0);"> 传递给视图。如果和 </font>`<font style="color:rgb(0, 0, 0);">@SessionAttributes</font>`<font style="color:rgb(0, 0, 0);"> 一起使用,它可以将属性直接添加到 </font>`<font style="color:rgb(0, 0, 0);">HttpSession</font>`<font style="color:rgb(0, 0, 0);">。</font>
|
||||||
`@ModelAttribute` 注解允许将数据放入模型中,并且在方法调用前通过 `Model` 传递给视图。如果和 `@SessionAttributes` 一起使用,它可以将属性直接添加到 `HttpSession`。
|
|
||||||
|
|
||||||
#### 示例:使用 `@ModelAttribute` 和 `@SessionAttributes`
|
|
||||||
|
|
||||||
|
#### <font style="color:rgb(0, 0, 0);">示例:使用 </font>`<font style="color:rgb(0, 0, 0);">@ModelAttribute</font>`<font style="color:rgb(0, 0, 0);"> 和 </font>`<font style="color:rgb(0, 0, 0);">@SessionAttributes</font>`
|
||||||
```java
|
```java
|
||||||
@Controller
|
@Controller
|
||||||
@SessionAttributes("cart")
|
@SessionAttributes("cart")
|
||||||
|
|
@ -111,15 +102,13 @@ public class CartController {
|
||||||
|
|
||||||
**URL 请求:**
|
**URL 请求:**
|
||||||
|
|
||||||
- `GET /addToCart?item=Apple` 会将 `Apple` 添加到 `cart` 中。
|
+ `<font style="color:rgb(0, 0, 0);">GET /addToCart?item=Apple</font>`<font style="color:rgb(0, 0, 0);"> 会将 </font>`<font style="color:rgb(0, 0, 0);">Apple</font>`<font style="color:rgb(0, 0, 0);"> 添加到 </font>`<font style="color:rgb(0, 0, 0);">cart</font>`<font style="color:rgb(0, 0, 0);"> 中。</font>
|
||||||
- `GET /viewCart` 会显示购物车中的内容。
|
+ `<font style="color:rgb(0, 0, 0);">GET /viewCart</font>`<font style="color:rgb(0, 0, 0);"> 会显示购物车中的内容。</font>
|
||||||
|
|
||||||
### 4. **通过** `@RequestParam` **或** `@PathVariable` **获取 Session 数据**
|
### <font style="color:rgb(0, 0, 0);">4. </font>**通过 **`<font style="color:rgb(0, 0, 0);">@RequestParam</font>`** 或 **`<font style="color:rgb(0, 0, 0);">@PathVariable</font>`** 获取 Session 数据**
|
||||||
|
<font style="color:rgb(0, 0, 0);">如果在请求中需要通过路径变量或请求参数传递数据并存储到 Session 中,可以结合 </font>`<font style="color:rgb(0, 0, 0);">@RequestParam</font>`<font style="color:rgb(0, 0, 0);"> 或 </font>`<font style="color:rgb(0, 0, 0);">@PathVariable</font>`<font style="color:rgb(0, 0, 0);"> 来实现。</font>
|
||||||
如果在请求中需要通过路径变量或请求参数传递数据并存储到 Session 中,可以结合 `@RequestParam` 或 `@PathVariable` 来实现。
|
|
||||||
|
|
||||||
#### 示例:使用 `@RequestParam` 存储 Session 数据
|
|
||||||
|
|
||||||
|
#### <font style="color:rgb(0, 0, 0);">示例:使用 </font>`<font style="color:rgb(0, 0, 0);">@RequestParam</font>`<font style="color:rgb(0, 0, 0);"> 存储 Session 数据</font>
|
||||||
```java
|
```java
|
||||||
@Controller
|
@Controller
|
||||||
public class SessionController {
|
public class SessionController {
|
||||||
|
|
@ -141,15 +130,13 @@ public class SessionController {
|
||||||
|
|
||||||
**URL 请求:**
|
**URL 请求:**
|
||||||
|
|
||||||
- `GET /setSession/JohnDoe` 会将 `"username": "JohnDoe"` 存储到 Session 中。
|
+ `<font style="color:rgb(0, 0, 0);">GET /setSession/JohnDoe</font>`<font style="color:rgb(0, 0, 0);"> 会将 </font>`<font style="color:rgb(0, 0, 0);">"username": "JohnDoe"</font>`<font style="color:rgb(0, 0, 0);"> 存储到 Session 中。</font>
|
||||||
- `GET /getSession` 会从 Session 中获取并显示 `username`。
|
+ `<font style="color:rgb(0, 0, 0);">GET /getSession</font>`<font style="color:rgb(0, 0, 0);"> 会从 Session 中获取并显示 </font>`<font style="color:rgb(0, 0, 0);">username</font>`<font style="color:rgb(0, 0, 0);">。</font>
|
||||||
|
|
||||||
### 5. **删除 Session 数据**
|
### <font style="color:rgb(0, 0, 0);">5. </font>**删除 Session 数据**
|
||||||
|
<font style="color:rgb(0, 0, 0);">如果希望在某个操作后清除 Session 中的某些数据,可以使用 </font>`<font style="color:rgb(0, 0, 0);">HttpSession</font>`<font style="color:rgb(0, 0, 0);"> 提供的 </font>`<font style="color:rgb(0, 0, 0);">removeAttribute</font>`<font style="color:rgb(0, 0, 0);"> 方法。</font>
|
||||||
如果希望在某个操作后清除 Session 中的某些数据,可以使用 `HttpSession` 提供的 `removeAttribute` 方法。
|
|
||||||
|
|
||||||
#### 示例:删除 Session 数据
|
|
||||||
|
|
||||||
|
#### <font style="color:rgb(0, 0, 0);">示例:删除 Session 数据</font>
|
||||||
```java
|
```java
|
||||||
@Controller
|
@Controller
|
||||||
public class SessionController {
|
public class SessionController {
|
||||||
|
|
@ -164,26 +151,23 @@ public class SessionController {
|
||||||
|
|
||||||
**URL 请求:**
|
**URL 请求:**
|
||||||
|
|
||||||
- `GET /removeSessionData` 会从 Session 中删除 `"username"` 属性。
|
+ `<font style="color:rgb(0, 0, 0);">GET /removeSessionData</font>`<font style="color:rgb(0, 0, 0);"> 会从 Session 中删除 </font>`<font style="color:rgb(0, 0, 0);">"username"</font>`<font style="color:rgb(0, 0, 0);"> 属性。</font>
|
||||||
|
|
||||||
### 6. **Session 过期与清理**
|
### <font style="color:rgb(0, 0, 0);">6. </font>**Session 过期与清理**
|
||||||
|
<font style="color:rgb(0, 0, 0);">默认情况下,Spring MVC 的 </font>`<font style="color:rgb(0, 0, 0);">HttpSession</font>`<font style="color:rgb(0, 0, 0);"> 会话会在用户关闭浏览器后过期,或者会话超时(默认30分钟)。可以在 </font>`<font style="color:rgb(0, 0, 0);">web.xml</font>`<font style="color:rgb(0, 0, 0);"> 或应用的配置类中设置会话超时:</font>
|
||||||
默认情况下,Spring MVC 的 `HttpSession` 会话会在用户关闭浏览器后过期,或者会话超时(默认30分钟)。可以在 `web.xml` 或应用的配置类中设置会话超时:
|
|
||||||
|
|
||||||
#### 示例:设置 Session 超时
|
|
||||||
|
|
||||||
|
#### <font style="color:rgb(0, 0, 0);">示例:设置 Session 超时</font>
|
||||||
```xml
|
```xml
|
||||||
<session-config>
|
<session-config>
|
||||||
<session-timeout>30</session-timeout> <!-- 设置会话超时为30分钟 -->
|
<session-timeout>30</session-timeout> <!-- 设置会话超时为30分钟 -->
|
||||||
</session-config>
|
</session-config>
|
||||||
|
|
||||||
```
|
```
|
||||||
|
|
||||||
### 7. **通过 Spring 配置 Session**
|
### <font style="color:rgb(0, 0, 0);">7. </font>**通过 Spring 配置 Session**
|
||||||
|
<font style="color:rgb(0, 0, 0);">通过 Spring 配置文件或 Java 配置类,还可以控制 Session 的相关行为(如会话过期时间、session 的持久化等)。</font>
|
||||||
通过 Spring 配置文件或 Java 配置类,还可以控制 Session 的相关行为(如会话过期时间、session 的持久化等)。
|
|
||||||
|
|
||||||
#### 示例:Java 配置类
|
|
||||||
|
|
||||||
|
#### <font style="color:rgb(0, 0, 0);">示例:Java 配置类</font>
|
||||||
```java
|
```java
|
||||||
@Configuration
|
@Configuration
|
||||||
@EnableWebMvc
|
@EnableWebMvc
|
||||||
|
|
@ -196,12 +180,15 @@ public class WebConfig implements WebMvcConfigurer {
|
||||||
}
|
}
|
||||||
```
|
```
|
||||||
|
|
||||||
`SessionInterceptor` 可以用于监控和管理 Session 数据。
|
`<font style="color:rgb(0, 0, 0);">SessionInterceptor</font>`<font style="color:rgb(0, 0, 0);"> 可以用于监控和管理 Session 数据。</font>
|
||||||
|
|
||||||
在 Spring MVC 中,向 Session 共享数据主要有以下几种方式:
|
> <font style="color:rgb(0, 0, 0);">在 Spring MVC 中,向 Session 共享数据主要有以下几种方式:</font>
|
||||||
|
>
|
||||||
|
> + `<font style="color:rgb(0, 0, 0);">HttpSession</font>`<font style="color:rgb(0, 0, 0);">:通过 </font>`<font style="color:rgb(0, 0, 0);">HttpSession</font>`<font style="color:rgb(0, 0, 0);"> 对象存储和读取 Session 数据。</font>
|
||||||
|
> + `<font style="color:rgb(0, 0, 0);">@SessionAttributes</font>`<font style="color:rgb(0, 0, 0);">:通过 </font>`<font style="color:rgb(0, 0, 0);">@SessionAttributes</font>`<font style="color:rgb(0, 0, 0);"> 注解将模型属性添加到 Session 中。</font>
|
||||||
|
> + `<font style="color:rgb(0, 0, 0);">@ModelAttribute</font>`<font style="color:rgb(0, 0, 0);">:结合 </font>`<font style="color:rgb(0, 0, 0);">@SessionAttributes</font>`<font style="color:rgb(0, 0, 0);"> 使用,将模型数据持久化到 Session 中。</font>
|
||||||
|
> + `<font style="color:rgb(0, 0, 0);">@RequestParam</font>`** 和 **`<font style="color:rgb(0, 0, 0);">@PathVariable</font>`<font style="color:rgb(0, 0, 0);">:将请求参数或路径变量存储到 Session 中。</font>
|
||||||
|
> + **Session 过期与清理**<font style="color:rgb(0, 0, 0);">:可以通过配置控制会话超时,或手动清除 Session 数据。</font>
|
||||||
|
>
|
||||||
|
|
||||||
- `HttpSession`:通过 `HttpSession` 对象存储和读取 Session 数据。
|
##
|
||||||
- `@SessionAttributes`:通过 `@SessionAttributes` 注解将模型属性添加到 Session 中。
|
|
||||||
- `@ModelAttribute`:结合 `@SessionAttributes` 使用,将模型数据持久化到 Session 中。
|
|
||||||
- `@RequestParam` **和** `@PathVariable`:将请求参数或路径变量存储到 Session 中。
|
|
||||||
- **Session 过期与清理**:可以通过配置控制会话超时,或手动清除 Session 数据。
|
|
||||||
|
|
|
||||||
|
|
@ -1,7 +1,4 @@
|
||||||
# 编写Spring应用
|
|
||||||
|
|
||||||
## `@SpringBootApplication` 注解
|
## `@SpringBootApplication` 注解
|
||||||
|
|
||||||
1. `@EnableAutoConfiguration`:
|
1. `@EnableAutoConfiguration`:
|
||||||
- 这个注解让 Spring Boot 根据项目中的依赖,自动配置 Spring 应用程序。Spring Boot 提供了大量的自动配置支持,帮助我们省去手动配置许多常见的功能。
|
- 这个注解让 Spring Boot 根据项目中的依赖,自动配置 Spring 应用程序。Spring Boot 提供了大量的自动配置支持,帮助我们省去手动配置许多常见的功能。
|
||||||
- 例如,如果你的项目中加入了 `spring-boot-starter-web` 依赖,Spring Boot 会自动配置一个嵌入式的 Tomcat 服务器和一些常见的 Web 功能。
|
- 例如,如果你的项目中加入了 `spring-boot-starter-web` 依赖,Spring Boot 会自动配置一个嵌入式的 Tomcat 服务器和一些常见的 Web 功能。
|
||||||
|
|
|
||||||
|
|
@ -1,7 +1,4 @@
|
||||||
# 访问控制
|
|
||||||
|
|
||||||
## 访问控制
|
## 访问控制
|
||||||
|
|
||||||
请求地址时返回对应的网页文件
|
请求地址时返回对应的网页文件
|
||||||
|
|
||||||
+ `@RestController`用于返回对象格式的内容,在后面会使用`ModelAndView`可以返回网页文件
|
+ `@RestController`用于返回对象格式的内容,在后面会使用`ModelAndView`可以返回网页文件
|
||||||
|
|
@ -42,7 +39,7 @@
|
||||||
### 错误页面设置
|
### 错误页面设置
|
||||||
在这个路径下可以配置错误码要访问的页面,也就是可以自定义页面内容
|
在这个路径下可以配置错误码要访问的页面,也就是可以自定义页面内容
|
||||||
|
|
||||||

|
|
||||||
|
|
||||||
### 使用`@Controller`
|
### 使用`@Controller`
|
||||||
返回需要访问的HTML内容页面,最后返回的字符串就是页面,这个页面位于`templates`目录下
|
返回需要访问的HTML内容页面,最后返回的字符串就是页面,这个页面位于`templates`目录下
|
||||||
|
|
|
||||||
|
|
@ -1,5 +1,3 @@
|
||||||
# 重定向和转发使用
|
|
||||||
|
|
||||||
在 Spring MVC 中,**重定向(Redirect)**和**转发(Forward)**是两种常见的请求处理方式,它们分别用于不同的场景。Spring 提供了灵活的 API 来实现这两种请求方式。
|
在 Spring MVC 中,**重定向(Redirect)**和**转发(Forward)**是两种常见的请求处理方式,它们分别用于不同的场景。Spring 提供了灵活的 API 来实现这两种请求方式。
|
||||||
|
|
||||||
### 1. **转发(Forward)**
|
### 1. **转发(Forward)**
|
||||||
|
|
|
||||||
|
|
@ -1,16 +0,0 @@
|
||||||
---
|
|
||||||
title: SpringBoot笔记
|
|
||||||
index: true
|
|
||||||
icon: devicon:spring
|
|
||||||
category:
|
|
||||||
- 笔记
|
|
||||||
- 记录
|
|
||||||
- 学习
|
|
||||||
- Java
|
|
||||||
- Spring
|
|
||||||
|
|
||||||
dir:
|
|
||||||
order: 2
|
|
||||||
---
|
|
||||||
|
|
||||||
## SpringBoot笔记
|
|
||||||
|
Before Width: | Height: | Size: 28 KiB |
|
Before Width: | Height: | Size: 23 KiB |
|
Before Width: | Height: | Size: 91 KiB |
|
Before Width: | Height: | Size: 16 KiB |
|
Before Width: | Height: | Size: 20 KiB |
|
Before Width: | Height: | Size: 20 KiB |
|
Before Width: | Height: | Size: 3.9 KiB |
|
Before Width: | Height: | Size: 16 KiB |
|
Before Width: | Height: | Size: 22 KiB |
|
Before Width: | Height: | Size: 17 KiB |
|
Before Width: | Height: | Size: 20 KiB |
|
Before Width: | Height: | Size: 22 KiB |
|
Before Width: | Height: | Size: 16 KiB |
|
|
@ -1,5 +1,4 @@
|
||||||
# Thymeleaf快速入门
|
## Thymeleaf快速入门
|
||||||
|
|
||||||
Thymeleaf 是一种现代化的 Java 模板引擎,广泛用于生成 HTML、XML、JavaScript 等内容。它有许多内置的指令和功能,用于渲染动态内容、条件渲染、循环、处理表达式等。以下是 Thymeleaf 中常见的指令和属性的详细介绍:
|
Thymeleaf 是一种现代化的 Java 模板引擎,广泛用于生成 HTML、XML、JavaScript 等内容。它有许多内置的指令和功能,用于渲染动态内容、条件渲染、循环、处理表达式等。以下是 Thymeleaf 中常见的指令和属性的详细介绍:
|
||||||
|
|
||||||
### 1. `th:text`
|
### 1. `th:text`
|
||||||
|
|
@ -1,5 +1,3 @@
|
||||||
# HttpUtil
|
|
||||||
|
|
||||||
```java
|
```java
|
||||||
import org.apache.commons.lang3.StringUtils;
|
import org.apache.commons.lang3.StringUtils;
|
||||||
import org.apache.http.HttpResponse;
|
import org.apache.http.HttpResponse;
|
||||||
|
|
|
||||||
|
|
@ -1,5 +1,3 @@
|
||||||
# Java递归示例
|
|
||||||
|
|
||||||
```java
|
```java
|
||||||
/**
|
/**
|
||||||
* * 构建权限树形结构
|
* * 构建权限树形结构
|
||||||
|
|
|
||||||
|
|
@ -1,5 +1,3 @@
|
||||||
# Knife4j配置
|
|
||||||
|
|
||||||
```java
|
```java
|
||||||
import io.swagger.v3.oas.models.ExternalDocumentation;
|
import io.swagger.v3.oas.models.ExternalDocumentation;
|
||||||
import io.swagger.v3.oas.models.OpenAPI;
|
import io.swagger.v3.oas.models.OpenAPI;
|
||||||
|
|
|
||||||
|
|
@ -1,5 +1,3 @@
|
||||||
# Minio工具类
|
|
||||||
|
|
||||||
```java
|
```java
|
||||||
package cn.bunny.module.minio.utils;
|
package cn.bunny.module.minio.utils;
|
||||||
|
|
||||||
|
|
|
||||||
|
|
@ -1,15 +0,0 @@
|
||||||
---
|
|
||||||
title: Utils通用类
|
|
||||||
index: false
|
|
||||||
icon: vscode-icons:file-type-class
|
|
||||||
category:
|
|
||||||
- 笔记
|
|
||||||
- 记录
|
|
||||||
- 学习
|
|
||||||
- Java
|
|
||||||
- utils
|
|
||||||
dir:
|
|
||||||
order: 4
|
|
||||||
---
|
|
||||||
|
|
||||||
<Catalog />
|
|
||||||
|
|
@ -1,5 +1,3 @@
|
||||||
# PageResult 类
|
|
||||||
|
|
||||||
```java
|
```java
|
||||||
import io.swagger.v3.oas.annotations.media.Schema;
|
import io.swagger.v3.oas.annotations.media.Schema;
|
||||||
import lombok.AllArgsConstructor;
|
import lombok.AllArgsConstructor;
|
||||||
|
|
@ -1,18 +1,3 @@
|
||||||
---
|
|
||||||
title: ResultUtils通用类
|
|
||||||
index: false
|
|
||||||
icon: vscode-icons:file-type-class
|
|
||||||
category:
|
|
||||||
- 笔记
|
|
||||||
- 记录
|
|
||||||
- 学习
|
|
||||||
- 问题
|
|
||||||
- Java
|
|
||||||
- utils
|
|
||||||
dir:
|
|
||||||
order: 5
|
|
||||||
---
|
|
||||||
|
|
||||||
```java
|
```java
|
||||||
import com.alibaba.fastjson2.annotation.JSONField;
|
import com.alibaba.fastjson2.annotation.JSONField;
|
||||||
import com.fasterxml.jackson.annotation.JsonFormat;
|
import com.fasterxml.jackson.annotation.JsonFormat;
|
||||||
|
|
@ -1,5 +1,3 @@
|
||||||
# Result 类
|
|
||||||
|
|
||||||
```java
|
```java
|
||||||
import io.swagger.v3.oas.annotations.media.Schema;
|
import io.swagger.v3.oas.annotations.media.Schema;
|
||||||
import lombok.AllArgsConstructor;
|
import lombok.AllArgsConstructor;
|
||||||
|
|
@ -1,5 +1,3 @@
|
||||||
# ResultEnum 统一结果状态类
|
|
||||||
|
|
||||||
```java
|
```java
|
||||||
import lombok.Getter;
|
import lombok.Getter;
|
||||||
|
|
||||||
|
|
@ -1,5 +1,3 @@
|
||||||
# 全局异常处理类
|
|
||||||
|
|
||||||
```java
|
```java
|
||||||
import cn.bunny.dao.vo.result.Result;
|
import cn.bunny.dao.vo.result.Result;
|
||||||
import cn.bunny.dao.vo.result.ResultCodeEnum;
|
import cn.bunny.dao.vo.result.ResultCodeEnum;
|
||||||
|
|
|
||||||
|
|
@ -1,11 +1,4 @@
|
||||||
---
|
|
||||||
icon: ri:java-fill
|
|
||||||
---
|
|
||||||
|
|
||||||
# 并发容器使用
|
|
||||||
|
|
||||||
## ArrayBlockingQueue使用
|
## ArrayBlockingQueue使用
|
||||||
|
|
||||||
```java
|
```java
|
||||||
ArrayBlockingQueue<String> queue = new ArrayBlockingQueue<>(8);
|
ArrayBlockingQueue<String> queue = new ArrayBlockingQueue<>(8);
|
||||||
|
|
||||||
|
|
|
||||||
|
|
@ -1,593 +0,0 @@
|
||||||
# Docker方式
|
|
||||||
|
|
||||||
## 安装Redis
|
|
||||||
|
|
||||||
配置文件创建
|
|
||||||
|
|
||||||
```bash
|
|
||||||
mkdir ~/docker/docker_data/redis_master/ -p
|
|
||||||
vim ~/docker/docker_data/redis_master/redis.conf
|
|
||||||
```
|
|
||||||
|
|
||||||
Redis配置文件
|
|
||||||
|
|
||||||
```properties
|
|
||||||
daemonize no
|
|
||||||
requirepass 123456
|
|
||||||
appendonly yes
|
|
||||||
tcp-keepalive 300
|
|
||||||
```
|
|
||||||
|
|
||||||
安装Redis镜像
|
|
||||||
|
|
||||||
```bash
|
|
||||||
docker run -p 6379:6379 --name redis_master \
|
|
||||||
-v ~/docker/docker_data/redis_master/redis.conf:/etc/redis/redis.conf \
|
|
||||||
-v ~/docker/docker_data/redis_master/data:/data \
|
|
||||||
--restart=always -d redis:7.0.10 --appendonly yes
|
|
||||||
```
|
|
||||||
|
|
||||||
## 安装Minio
|
|
||||||
|
|
||||||
```bash
|
|
||||||
docker run -d \
|
|
||||||
-p 9000:9000 \
|
|
||||||
-p 9090:9090 \
|
|
||||||
--name minio_master --restart=always \
|
|
||||||
-v ~/docker/docker_data/minio/data:/data \
|
|
||||||
-e "MINIO_ROOT_USER=bunny" \
|
|
||||||
-e "MINIO_ROOT_PASSWORD=02120212" \
|
|
||||||
minio/minio server /data --console-address ":9090"
|
|
||||||
```
|
|
||||||
|
|
||||||
## 安装MySQL
|
|
||||||
|
|
||||||
```bash
|
|
||||||
# 创建3306配置文件
|
|
||||||
sudo mkdir -p ~/docker/docker_data/mysql/mysql_master/etc
|
|
||||||
sudo vim ~/docker/docker_data/mysql/mysql_master/etc/my.cnf
|
|
||||||
```
|
|
||||||
|
|
||||||
**my.cnf 配置**
|
|
||||||
|
|
||||||
```sql
|
|
||||||
[mysqld]
|
|
||||||
skip-host-cache
|
|
||||||
skip-name-resolve
|
|
||||||
secure-file-priv=/var/lib/mysql-files
|
|
||||||
user=mysql
|
|
||||||
|
|
||||||
# 设置字符集
|
|
||||||
character-set-server=utf8mb4
|
|
||||||
collation-server=utf8mb4_unicode_ci
|
|
||||||
|
|
||||||
# 设置服务器ID(如果是复制集群,确保每个节点的ID唯一)
|
|
||||||
server-id=1
|
|
||||||
|
|
||||||
# 启用二进制日志
|
|
||||||
log-bin=mysql-bin
|
|
||||||
|
|
||||||
# 设置表名不区分大小写
|
|
||||||
lower_case_table_names = 1
|
|
||||||
```
|
|
||||||
|
|
||||||
**启动MySQL**
|
|
||||||
|
|
||||||
```bash
|
|
||||||
docker stop mysql_master
|
|
||||||
docker rm mysql_master
|
|
||||||
|
|
||||||
docker run --name mysql_master -p 3306:3306 \
|
|
||||||
-v ~/docker/docker_data/mysql/mysql_master/etc/my.cnf:/etc/my.cnf \
|
|
||||||
-v ~/docker/docker_data/mysql/mysql_master/data:/var/lib/mysql \
|
|
||||||
-v ~/docker/docker_data/mysql/mysql_master/backup:/backup \
|
|
||||||
--restart=always --privileged=true \
|
|
||||||
-e MYSQL_ROOT_PASSWORD=123456 \
|
|
||||||
-e TZ=Asia/Shanghai \
|
|
||||||
mysql:8.0.33 --lower-case-table-names=1
|
|
||||||
```
|
|
||||||
|
|
||||||
**修改密码**
|
|
||||||
|
|
||||||
```sql
|
|
||||||
# 进入容器
|
|
||||||
docker exec -it mysql /bin/bash
|
|
||||||
|
|
||||||
# 执行SQL命令
|
|
||||||
mysql -uroot -p123456
|
|
||||||
use mysql
|
|
||||||
ALTER USER 'root'@'%' IDENTIFIED BY "123456";
|
|
||||||
FLUSH PRIVILEGES;
|
|
||||||
```
|
|
||||||
|
|
||||||
## 安装PostgreSQL
|
|
||||||
|
|
||||||
```bash
|
|
||||||
docker run --name pg -e POSTGRES_PASSWORD=123456 -e POSTGRES_USER=postgres -p 5432:5432 -d postgres:latest
|
|
||||||
```
|
|
||||||
|
|
||||||
## 安装MSSQL
|
|
||||||
|
|
||||||
```shell
|
|
||||||
docker run -e "ACCEPT_EULA=Y" -e "MSSQL_SA_PASSWORD=123456bunny." \
|
|
||||||
-p 1433:1433 --name mssql --hostname mssql \
|
|
||||||
-d --restart=always mcr.microsoft.com/mssql/server:2022-latest
|
|
||||||
```
|
|
||||||
|
|
||||||
设置大小写敏感:Chinese_PRC_CS_AI
|
|
||||||
|
|
||||||
设置忽略大小写: Chinese_PRC_CI_AI
|
|
||||||
|
|
||||||
## 安装MongoDB
|
|
||||||
|
|
||||||
### 创建数据库
|
|
||||||
|
|
||||||
```shell
|
|
||||||
docker stop mongodb
|
|
||||||
docker rm mongodb
|
|
||||||
|
|
||||||
docker run -it \
|
|
||||||
--name mongodb \
|
|
||||||
--restart=always \
|
|
||||||
--privileged \
|
|
||||||
-p 27017:27017 \
|
|
||||||
-v ~/docker/docker_data/mongo/data:/data/db \
|
|
||||||
-v ~/docker/docker_data/mongo/conf:/data/configdb \
|
|
||||||
-v ~/docker/docker_data/mongo/logs:/data/log/ \
|
|
||||||
-d mongo:latest \
|
|
||||||
-f /data/configdb/mongod.conf
|
|
||||||
```
|
|
||||||
|
|
||||||
需要设置权限
|
|
||||||
|
|
||||||
```plain
|
|
||||||
mkdir -p ~/docker/docker_data/mongo/conf
|
|
||||||
mkdir -p ~/docker/docker_data/mongo/logs
|
|
||||||
chmod 777 ~/docker/docker_data/mongo/logs
|
|
||||||
chmod 777 ~/docker/docker_data/mongo/conf
|
|
||||||
|
|
||||||
cd ~/docker/docker_data/mongo/logs
|
|
||||||
touch mongod.log
|
|
||||||
chmod 777 mongod.log
|
|
||||||
|
|
||||||
cd ~/docker/docker_data/mongo/conf
|
|
||||||
vim mongod.conf
|
|
||||||
```
|
|
||||||
|
|
||||||
### 配置文件
|
|
||||||
|
|
||||||
```properties
|
|
||||||
# 数据库文件存储位置
|
|
||||||
dbpath = /data/db
|
|
||||||
# log文件存储位置
|
|
||||||
logpath = /data/log/mongod.log
|
|
||||||
# 使用追加的方式写日志
|
|
||||||
logappend = true
|
|
||||||
# 是否以守护进程方式运行
|
|
||||||
# fork = true
|
|
||||||
# 全部ip可以访问
|
|
||||||
bind_ip = 0.0.0.0
|
|
||||||
# 端口号
|
|
||||||
port = 27017
|
|
||||||
# 是否启用认证
|
|
||||||
auth = true
|
|
||||||
# 设置oplog的大小(MB)
|
|
||||||
oplogSize=2048
|
|
||||||
```
|
|
||||||
|
|
||||||
### 设置账户密码
|
|
||||||
|
|
||||||
```shell
|
|
||||||
#进入容器
|
|
||||||
docker exec -it mongodb /bin/bash
|
|
||||||
|
|
||||||
#进入mongodb shell
|
|
||||||
mongosh --port 27017
|
|
||||||
|
|
||||||
#切换到admin库
|
|
||||||
use admin
|
|
||||||
|
|
||||||
#创建账号/密码
|
|
||||||
db.createUser({ user: 'admin', pwd: '02120212', roles: [ { role: "root", db: "admin" } ] });
|
|
||||||
# db.createUser({ user: 'admin', pwd: '123456', roles: [ { role: "userAdminAnyDatabase", db: "admin" } ] });
|
|
||||||
```
|
|
||||||
|
|
||||||
## 安装Nacos
|
|
||||||
|
|
||||||
安装完成后打开`IP地址:8848/nacos`
|
|
||||||
|
|
||||||
```bash
|
|
||||||
docker run -d -p 8848:8848 -p 9848:9848 -e MODE=standalone --name nacos nacos/nacos-server:v2.4.3
|
|
||||||
```
|
|
||||||
|
|
||||||
## 安装Sentinel
|
|
||||||
|
|
||||||
安装之后打开端口`IP地址:8858`
|
|
||||||
|
|
||||||
```bash
|
|
||||||
docker pull bladex/sentinel-dashboard:1.8.8
|
|
||||||
docker run --name sentinel \
|
|
||||||
-p 8858:8858 \
|
|
||||||
--privileged=true \
|
|
||||||
--restart=always \
|
|
||||||
-d bladex/sentinel-dashboard:1.8.8
|
|
||||||
```
|
|
||||||
|
|
||||||
## 安装Seata
|
|
||||||
|
|
||||||
设置的端口号为:8091
|
|
||||||
|
|
||||||
网页打开地址 :IP地址:7091
|
|
||||||
|
|
||||||
```bash
|
|
||||||
docker pull apache/seata-server:2.3.0.jdk21
|
|
||||||
docker run -d \
|
|
||||||
-p 8091:8091 \
|
|
||||||
--name seata-server apache/seata-server:2.3.0.jdk21
|
|
||||||
```
|
|
||||||
|
|
||||||
## 安装rabbitmq
|
|
||||||
|
|
||||||
```shell
|
|
||||||
docker run -d --name rabbitmq_master --restart=always \
|
|
||||||
-p 5672:5672 -p 15672:15672 \
|
|
||||||
-v ~/docker/docker_data/rabbitmq_master/data:/var/lib/rabbitmq_master \
|
|
||||||
-v ~/docker/docker_data/rabbitmq_master/conf:/etc/rabbitmq_master \
|
|
||||||
-v ~/docker/docker_data/rabbitmq_master/log:/var/log/rabbitmq_master \
|
|
||||||
-v ~/docker/docker_data/rabbitmq_master/plugin:/plugins \
|
|
||||||
-e RABBITMQ_DEFAULT_VHOST=rabbitmq_master \
|
|
||||||
-e RABBITMQ_DEFAULT_USER=admin \
|
|
||||||
-e RABBITMQ_DEFAULT_PASS=admin rabbitmq:3.13.7-management
|
|
||||||
```
|
|
||||||
|
|
||||||
### 进入容器
|
|
||||||
|
|
||||||
```shell
|
|
||||||
docker stop rabbitmq_master
|
|
||||||
docker rm rabbitmq_master
|
|
||||||
|
|
||||||
docker logs rabbitmq_master
|
|
||||||
|
|
||||||
docker exec -it rabbitmq_master bash
|
|
||||||
rabbitmq-plugins enable rabbitmq_management
|
|
||||||
```
|
|
||||||
|
|
||||||
### 无法登录
|
|
||||||
|
|
||||||
```shell
|
|
||||||
#进入容器
|
|
||||||
docker exec -it 你的容器名或者id /bash
|
|
||||||
|
|
||||||
# 添加用户
|
|
||||||
rabbitmqctl add_user 用户名 密码
|
|
||||||
|
|
||||||
# 如果存在可以先删除
|
|
||||||
rabbitmqctl delete_user 用户名
|
|
||||||
|
|
||||||
#设置用户操作权限
|
|
||||||
rabbitmqctl set_user_tags 用户名 administrator
|
|
||||||
```
|
|
||||||
|
|
||||||
#### 添加
|
|
||||||
|
|
||||||
```shell
|
|
||||||
#进入容器
|
|
||||||
docker exec -it 你的容器名或者id /bin/bash
|
|
||||||
|
|
||||||
# 添加用户
|
|
||||||
rabbitmqctl add_user admin 123456
|
|
||||||
#设置用户操作权限
|
|
||||||
rabbitmqctl set_user_tags admin administrator
|
|
||||||
```
|
|
||||||
|
|
||||||
## 安装elasticsearch
|
|
||||||
|
|
||||||
### 创建网络
|
|
||||||
|
|
||||||
```shell
|
|
||||||
docker network create es-net
|
|
||||||
```
|
|
||||||
|
|
||||||
**如果有导入**
|
|
||||||
|
|
||||||
```bash
|
|
||||||
docker load -i es.tar
|
|
||||||
```
|
|
||||||
|
|
||||||
**运行容器**
|
|
||||||
|
|
||||||
```shell
|
|
||||||
docker run -d \
|
|
||||||
--name elasticsearch \
|
|
||||||
-e "ES_JAVA_OPTS=-Xms512m -Xmx512m" \
|
|
||||||
-e "discovery.type=single-node" \
|
|
||||||
-v /bunny/docker/es/data:/usr/share/elasticsearch/data \
|
|
||||||
-v /bunny/docker/es/plugins:/usr/share/elasticsearch/plugins \
|
|
||||||
--privileged \
|
|
||||||
--network es-net \
|
|
||||||
-p 9200:9200 \
|
|
||||||
-p 9300:9300 \
|
|
||||||
--restart=always elasticsearch:7.12.1
|
|
||||||
```
|
|
||||||
|
|
||||||
## Harbor安装
|
|
||||||
|
|
||||||
### 下载Harbor
|
|
||||||
|
|
||||||
github下载地址:https://github.com/goharbor/harbor/releases
|
|
||||||
|
|
||||||
```bash
|
|
||||||
# 解压tgz包
|
|
||||||
tar -zxvf harbor-offline-installer-v2.10.1.tgz
|
|
||||||
# 进入目录后进行复制配置文件
|
|
||||||
cd harbor/
|
|
||||||
# 创建一个配置文件
|
|
||||||
cp harbor.yml.tmpl harbor.yml
|
|
||||||
# 修改配置文件
|
|
||||||
vim harbor.yml
|
|
||||||
```
|
|
||||||
|
|
||||||

|
|
||||||
|
|
||||||

|
|
||||||
|
|
||||||
在我的当前版本中默认密码修改后无法访问,需要查看数据库密码
|
|
||||||
|
|
||||||
```bash
|
|
||||||
# 进入容器
|
|
||||||
docker exec -it harbor-core bash
|
|
||||||
# 查看密码
|
|
||||||
printenv | grep PASSWORD
|
|
||||||
```
|
|
||||||
|
|
||||||

|
|
||||||
|
|
||||||
### 安装Harbor
|
|
||||||
|
|
||||||
sh install.sh
|
|
||||||
|
|
||||||
启动相关命令这个启动方式需要在你的目录/harbor/下执行,我的当前目录是/root/harbor/所以需要在这个目录下启动,否则会报找不到指定文件等错误。
|
|
||||||
|
|
||||||
```bash
|
|
||||||
# 关闭 Harbor
|
|
||||||
docker compose -f docker-compose.yml stop
|
|
||||||
|
|
||||||
# 启动 Harbor
|
|
||||||
docker compose -f docker-compose.yml up -d
|
|
||||||
```
|
|
||||||
|
|
||||||
## 安装YApi
|
|
||||||
|
|
||||||
```bash
|
|
||||||
docker run -d --name mongo-yapi mongo:4.2
|
|
||||||
|
|
||||||
docker run -it --rm \
|
|
||||||
--link mongo-yapi:mongo \
|
|
||||||
--entrypoint npm \
|
|
||||||
--workdir /api/vendors \
|
|
||||||
registry.cn-hangzhou.aliyuncs.com/anoy/yapi \
|
|
||||||
run install-server
|
|
||||||
|
|
||||||
# 方式二
|
|
||||||
docker run -d \
|
|
||||||
--name yapi \
|
|
||||||
--link mongo-yapi:mongo \
|
|
||||||
--workdir /api/vendors \
|
|
||||||
-p 3001:3000 \
|
|
||||||
registry.cn-hangzhou.aliyuncs.com/anoy/yapi \
|
|
||||||
server/app.js
|
|
||||||
log: mongodb load success...
|
|
||||||
初始化管理员账号成功,账号名:"admin@admin.com",密码:"ymfe.org"
|
|
||||||
```
|
|
||||||
|
|
||||||
## 安装ChatGPT
|
|
||||||
|
|
||||||
```shell
|
|
||||||
docker pull yidadaa/chatgpt-next-web
|
|
||||||
|
|
||||||
docker run -d -p 4000:3000 --name chatgpt-next-web \
|
|
||||||
-e OPENAI_API_KEY="sk-Oe0WUg94fsex5aPVwnfkvl5Rh0Rl6jbrpSj8nNRTkN4tVwIA" \
|
|
||||||
-e BASE_URL=https://api.chatanywhere.com.cn yidadaa/chatgpt-next-web
|
|
||||||
|
|
||||||
# 开启启动
|
|
||||||
docker update --restart=always chatgpt-next-web
|
|
||||||
```
|
|
||||||
|
|
||||||
## 安装Gitea
|
|
||||||
|
|
||||||
**docker配置文件**
|
|
||||||
|
|
||||||
```yaml
|
|
||||||
version: "3"
|
|
||||||
|
|
||||||
networks:
|
|
||||||
gitea:
|
|
||||||
external: false
|
|
||||||
|
|
||||||
services:
|
|
||||||
server:
|
|
||||||
image: gitea/gitea:1.21.3
|
|
||||||
container_name: gitea
|
|
||||||
environment:
|
|
||||||
- USER_UID=1000
|
|
||||||
- USER_GID=1000
|
|
||||||
- GITEA__database__DB_TYPE=mysql
|
|
||||||
- GITEA__database__HOST=192.168.3.98:3305
|
|
||||||
- GITEA__database__NAME=gitea
|
|
||||||
- GITEA__database__USER=gitea
|
|
||||||
- GITEA__database__PASSWD=gitea
|
|
||||||
restart: always
|
|
||||||
networks:
|
|
||||||
- gitea
|
|
||||||
volumes:
|
|
||||||
- ./bunny/docker_data/gitea:/data
|
|
||||||
- /etc/timezone:/etc/timezone:ro
|
|
||||||
- /etc/localtime:/etc/localtime:ro
|
|
||||||
ports:
|
|
||||||
- "3000:3000"
|
|
||||||
- "222:22"
|
|
||||||
depends_on:
|
|
||||||
- db
|
|
||||||
|
|
||||||
db:
|
|
||||||
container_name: mysql_gitea
|
|
||||||
image: mysql:8
|
|
||||||
restart: always
|
|
||||||
environment:
|
|
||||||
- MYSQL_ROOT_PASSWORD=gitea
|
|
||||||
- MYSQL_USER=gitea
|
|
||||||
- MYSQL_PASSWORD=gitea
|
|
||||||
- MYSQL_DATABASE=gitea
|
|
||||||
volumes:
|
|
||||||
- /bunny/docker_data/mysql_gitea:/var/lib/mysql
|
|
||||||
ports:
|
|
||||||
- "3305:3306"
|
|
||||||
```
|
|
||||||
|
|
||||||
**执行命令**
|
|
||||||
|
|
||||||
```shell
|
|
||||||
docker stop gitea
|
|
||||||
docker rm gitea
|
|
||||||
|
|
||||||
docker stop a6861d426b53
|
|
||||||
docker rm a6861d426b53
|
|
||||||
|
|
||||||
docker-compose up -d
|
|
||||||
docker logs gitea
|
|
||||||
```
|
|
||||||
|
|
||||||
**进入容器**
|
|
||||||
|
|
||||||
```shell
|
|
||||||
docker exec -it local_db_1 bash
|
|
||||||
mysql -ugitea -pgitea
|
|
||||||
USE gitea;
|
|
||||||
ALTER USER 'gitea'@'%' IDENTIFIED BY "gitea";
|
|
||||||
GRANT ALL PRIVILEGES ON gitea.* TO 'gitea'@'%';
|
|
||||||
FLUSH PRIVILEGES;
|
|
||||||
|
|
||||||
mysql -uroot -pgitea
|
|
||||||
```
|
|
||||||
|
|
||||||
**开启防火墙**
|
|
||||||
|
|
||||||
```shell
|
|
||||||
firewall-cmd --zone=public --add-port=4000/tcp --permanent
|
|
||||||
```
|
|
||||||
|
|
||||||
## 安装git
|
|
||||||
|
|
||||||
**要确保git的版本大于**`2.0.0`**否则后面无法完成安装!!!**
|
|
||||||
|
|
||||||
这里使用的`wget`的方式下载,之后解压后安装
|
|
||||||
|
|
||||||
https://mirrors.edge.kernel.org/pub/software/scm/git/
|
|
||||||
|
|
||||||
**安装编译环境**
|
|
||||||
|
|
||||||
```shell
|
|
||||||
yum install curl-devel expat-devel gettext-devel \
|
|
||||||
openssl-devel zlib-devel
|
|
||||||
```
|
|
||||||
|
|
||||||
**执行命令**
|
|
||||||
|
|
||||||
```shell
|
|
||||||
make prefix=/usr/local/git all
|
|
||||||
sudo make prefix=/usr/local/git install
|
|
||||||
```
|
|
||||||
|
|
||||||
**开机启动**
|
|
||||||
|
|
||||||
```shell
|
|
||||||
docker update --restart=always 76bad48de9c7
|
|
||||||
docker update --restart=always adea530fd5cd
|
|
||||||
```
|
|
||||||
|
|
||||||
## 安装Jenkins
|
|
||||||
|
|
||||||
```shell
|
|
||||||
docker run -u root -d --name myjenkins \
|
|
||||||
-p 8040:8080 -p 50000:50000 \
|
|
||||||
-v /data/jenkins_home:/var/jenkins_home \
|
|
||||||
--restart=always jenkinsci/blueocean
|
|
||||||
```
|
|
||||||
|
|
||||||
访问http://192.168.3.98:8040/
|
|
||||||
|
|
||||||
### 查看密码
|
|
||||||
|
|
||||||
```shell
|
|
||||||
cat /var/jenkins_home/secrets/initialAdminPassword
|
|
||||||
00a1fcf9b2d444ac821b5e57ea157293
|
|
||||||
```
|
|
||||||
|
|
||||||
### default.json所在目录
|
|
||||||
|
|
||||||
```shell
|
|
||||||
/var/jenkins_home/updates/default.json
|
|
||||||
```
|
|
||||||
|
|
||||||
### 进入目录
|
|
||||||
|
|
||||||
```shell
|
|
||||||
cd /var/jenkins_home/updates/
|
|
||||||
```
|
|
||||||
|
|
||||||
### 替换节点信息
|
|
||||||
|
|
||||||
```shell
|
|
||||||
sed -i 's/www.google.com/www.baidu.com/g' default.json
|
|
||||||
sed -i 's/updates.jenkins-ci.org\/download/mirrors.tuna.tsinghua.edu.cn\/jenkins/g' default.json
|
|
||||||
```
|
|
||||||
|
|
||||||
### 重启 Jenkins
|
|
||||||
|
|
||||||
```shell
|
|
||||||
docker restart myjenkins
|
|
||||||
```
|
|
||||||
|
|
||||||
## 部署kibana
|
|
||||||
|
|
||||||
```shell
|
|
||||||
docker run -d \
|
|
||||||
--name kibana \
|
|
||||||
-e ELASTICSEARCH_HOSTS=http://es:9200 \
|
|
||||||
--network=es-net \
|
|
||||||
-p 5601:5601 \
|
|
||||||
kibana:7.12.1
|
|
||||||
```
|
|
||||||
|
|
||||||
验证:http://192.168.3.98:5601/app/home#/
|
|
||||||
|
|
||||||
### 重启es
|
|
||||||
|
|
||||||
```shell
|
|
||||||
docker restart es
|
|
||||||
```
|
|
||||||
|
|
||||||
### 设置屏蔽词和扩展词
|
|
||||||
|
|
||||||
```shell
|
|
||||||
docker restart es
|
|
||||||
```
|
|
||||||
|
|
||||||
配置文件
|
|
||||||
|
|
||||||
```xml
|
|
||||||
<?xml version="1.0" encoding="UTF-8"?>
|
|
||||||
<!DOCTYPE properties SYSTEM "http://java.sun.com/dtd/properties.dtd">
|
|
||||||
<properties>
|
|
||||||
<comment>IK Analyzer 扩展配置</comment>
|
|
||||||
<!--用户可以在这里配置自己的扩展字典 -->
|
|
||||||
<entry key="ext_dict">extra.dic</entry>
|
|
||||||
<!--用户可以在这里配置自己的扩展停止词字典-->
|
|
||||||
<entry key="ext_stopwords">stopword.dic</entry>
|
|
||||||
<!--用户可以在这里配置远程扩展字典 -->
|
|
||||||
<!-- <entry key="remote_ext_dict">words_location</entry> -->
|
|
||||||
<!--用户可以在这里配置远程扩展停止词字典-->
|
|
||||||
<!-- <entry key="remote_ext_stopwords">words_location</entry> -->
|
|
||||||
</properties>
|
|
||||||
```
|
|
||||||
|
|
||||||
|
|
@ -1,17 +0,0 @@
|
||||||
---
|
|
||||||
title: 环境相关
|
|
||||||
index: true
|
|
||||||
icon: bitcoin-icons:linux-terminal-filled
|
|
||||||
headerDepth: 4
|
|
||||||
category:
|
|
||||||
- 笔记
|
|
||||||
- 记录
|
|
||||||
- 学习
|
|
||||||
- 问题
|
|
||||||
- Linux
|
|
||||||
- 环境
|
|
||||||
---
|
|
||||||
|
|
||||||
<Catalog />
|
|
||||||
|
|
||||||
## 环境搭建
|
|
||||||